Edge computing helps reduce latency and power consumption by performing signal processing at the source of the data. Recently ARM released the CMSIS-NN library, an efficient neural network library optimized for the Cortex-M based microcontrollers. The CMSIS-NN library (pronounced Sim-Sis) brings deep learning to low-power microcontrollers such as the Cortex-M7 based OpenMV camera. In this blog post we'll go through training a custom neural network using Caffe on a PC and deploying the network on the OpenMV Cam.
CMSIS-NN:
The CMSIS-NN library consists of a number of optimized neural network functions using SIMD and DSP instructions, separable convolutions, etc... and most importantly, it supports 8-bit fixed point representation. Using fixed-point avoids costly floating point operations, reduces the memory footprint, and uses less power when running inference. However, this means that models have to be quantized first before using them with CMSIS-NN.
Quantization, simply put, is the mapping of a range of numbers to a more compact range of numbers, or in this case the mapping of 32-bits floats to 8-bit fixed-point numbers. The hardest part about quantizing models is finding the min and max ranges of layer inputs/outputs to evenly distribute the floating point values across an 8-bit representation. Fortunately, ARM also provides a script to quantize Caffe model weights and activations. If you're interested in more details about the CMSIS-NN library and the quantization process please see this paper published by ARM researchers.
The default CMSIS-NN library comes with a CNN example trained on the CIFAR-10 dataset. However, this example is hard-coded, meaning it must compiled and linked with the main application. So, we extended the CMSIS-NN library and supporting scripts. Our code allows users to convert Caffe models to a quantized binary format which can be loaded from the file-system (SD Card or internal flash) at run-time. Additionally, our code takes care of preprocessing the input image, subtracting the mean, and scaling the data if required.
In the next sections of this blog post I'll demonstrate how to use the CMSIS-NN library with the OpenMV camera to train a simple CNN model on a smile detection dataset. The model achieves ~93% accuracy and the camera consumes about 150mA @ 3.3V while running the network.
Training a network with Caffe:
First, if you're just getting started with neural networks and Caffe I highly recommend this tutorial. Note that you should keep in mind the CMSIS-NN library and conversion scripts have limitations on the number and types of supported layers - so your model should be simple.
Dataset:
The smile dataset that we used can be found here. The dataset consists of ~3000 positive images and ~9000 negative images. We need the number of positive and negative images to be close otherwise the network will biased to a class (class imbalance). To fix this we can augment the dataset using this augmentation script on the positive images to increase the number of positive examples by 4x. The image augmentation script can be used like this:
python2 augment_images.py --input images/train/ --output images/train_aug/ --count 4
Training the network:
You can use any deep learning library to train the network. However, if you're not using Caffe you need to convert the network output to a Caffe format to work with the ARM scripts. In the future ARM will provide more conversion scripts to accept models from TensorFlow, etc.
Quantizing the model:
The first step after training the network is to use the quantization script provided by ARM to convert the Caffe model weights and activations from floating point to fixed point format. As mentioned before, quantization is performed to reduce the size of the network and avoid floating point computations.
The nn_quantizer script works by testing the network and figuring out the best format for the dynamic fixed point representation. The output of this script is a serialized Python (.pkl) file which includes the network's model, quantized weights and activations, and the quantization format of each layer. Running this command generates the quantized model:
python2 nn_quantizer.py --model models/smile/smile_train_test.prototxt --weights models/smile/smile_iter_*.caffemodel --save models/smile/smile.pkl
Converting the model to binary:
The next step is to use our NN converter script to convert the model into a binary format runnable by the OpenMV Cam. The converter script outputs a code for each layer type followed by the layer's dimensions and weights (if any).
On the OpenMV Cam our firmware reads the binary file and builds the network in memory using a linked-list like structure.
Running this command generates the binary model:
python2 nn_convert.py --model models/smile/smile.pkl --mean /path/to/mean.binaryproto --output smile.network
Deployment on an OpenMV camera:
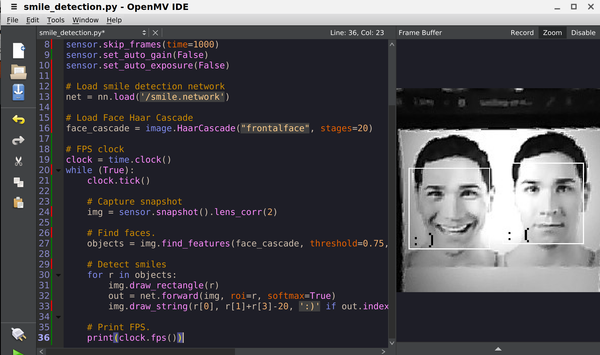
While it's possible to slide the detection window over the entire image doing so would be very slow. Instead we use the built-in Haar cascade face detector to extract faces from the image, and then pass the region of interest (ROI) to the CNN to detect smiles. The first part of the smile detection code loads the network into memory and loads the built-in face detection Haar Cascade.
# Load Smile Detection network
net = nn.load('/smile.network')

# Load Face Detection Haar Cascade
face_cascade = image.HaarCascade("frontalface", stages=25)
print(face_cascade)
The next step is capturing a snapshot and finding all the faces.
# Capture snapshot
img = sensor.snapshot()
# Find faces.
objects = img.find_features(face_cascade, threshold=0.75, scale_factor=1.25)
Finally, for each detected face, the region of interest is slightly cropped and passed to the neural network. Note that the smile detection network is trained on tightly cropped faces so we have to reduce the size of the ROI.
# Detect smiles
for r in objects:
  # Resize and center detection area
  r = [r[0]+10, r[1]+25, int(r[2]*0.70), int(r[2]*0.70)]
  out = net.forward(img, roi=r, softmax=True)
  img.draw_string(r[0], r[1], ':)' if (out[0] > 0.8) else ':(', color=0, scale=2)
Moving forwards:
The OpenMV Cam uses the Cortex-M7 processor without any external DRAM attached and only uses the internal SRAM. At any point in time the processor can go into low-power mode drawing about 50 uA while maintaining all state, then wake-up again on an interrupt, take a picture, and run the neural network before turning off again.
For example, on the upcoming OpenMV Cam H7 we're able to run a Lenet-6 CNN trained on the MNIST data set at 50 FPS while using only 3mA @ 3.3V per inference. With a 1Ah 3.7V Lipo battery you can deploy a CNN in the field running every minute that would last for over a year.
In particular, CNN support on Cortex-M7 processors lines up particularly well with deploying smart thermal vision based cameras that are able to detect people accurately from low-resolution thermal vision images. Smart sensors powered by CMSIS-NN and Cortex-M7 processors are coming soon!
For a MNIST demonstration checkout the video below:
Firmware Release:
You can grab the latest firmware (v3.0.0) from our GitHub here. Example scripts are here. And the models are here. The OpenMV IDE release to package everything up is coming soon.