Being selected as a finalist gives us access to a free booth at the Embedded Vision Summit in Santa Clara May 22nd to the 23rd. So, if you'd like to say hello, come on out! I'll be there doing demos and answering questions. To that point, we've been given a discount code for for the summit that's valid until the April 26th for 15% off the ticket price. Use the promo code: SUMMIT24-PARTNER when registering online here if you'd like to come out and see what folks are doing with computer vision on the edge.
Also! I will be pitching OpenMV at the Embedded Vision Conference on May 23rd at 4pm PST for the Vision Tank competition at the conference.
Almost every product on our store now has an embedded Altium viewer so you can easily dive into the schematic and match it to the PCB design. And, we've also got 3D CAD side-by-side the product images too!
And if that wasn't enough, we also have accurate 3D CAD hosted on GrabCAD! You can download STEP files for everything we sell now to make it easy to build something with our technology.
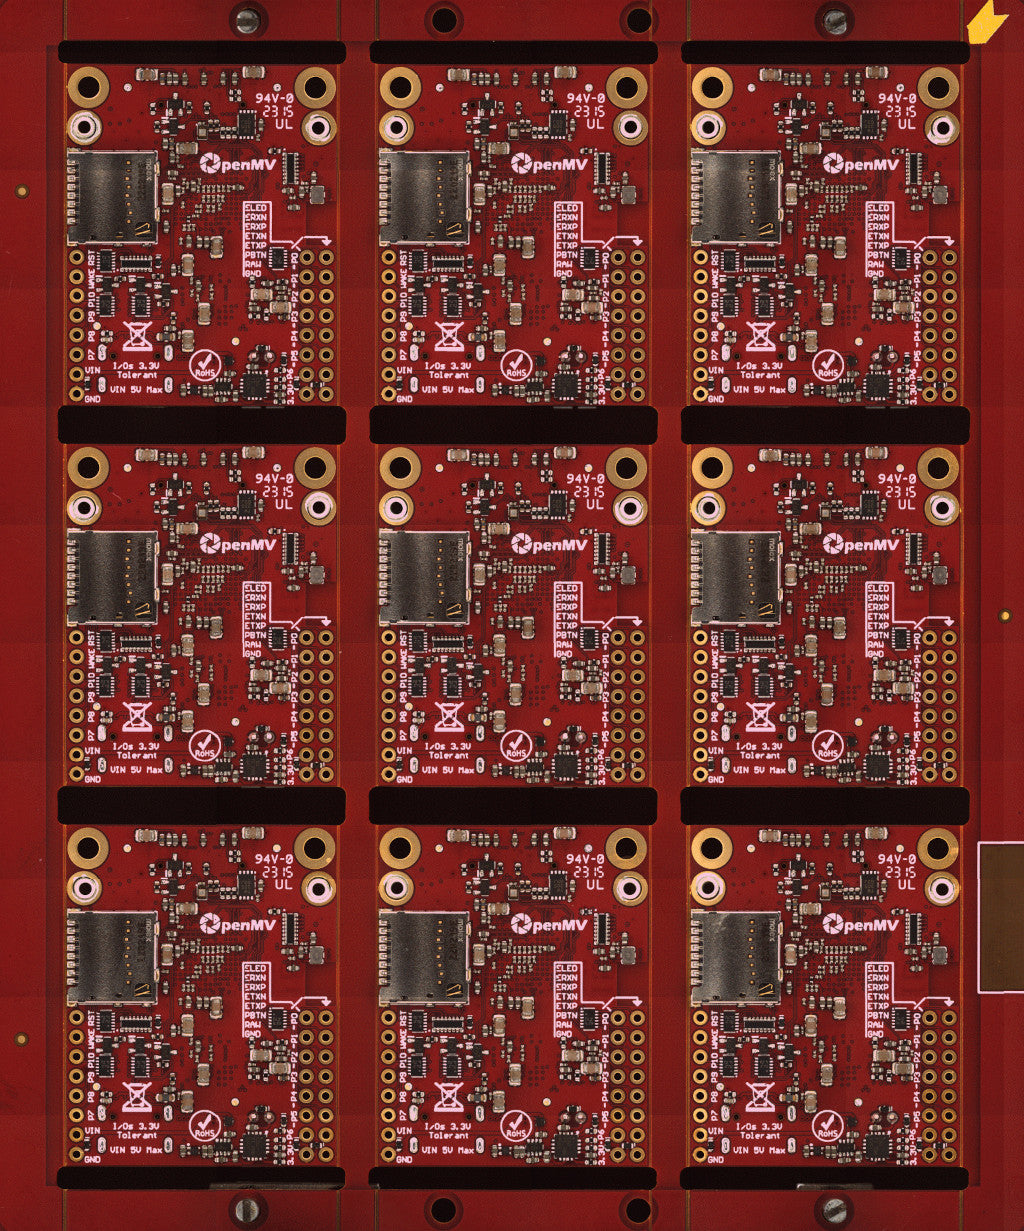
Pretty spectacular! This was a tremendous amount of work to push through. But, we've now converted the vast majority of our legacy designs from Eagle to Altium now. Thanks to this we can generate accurate 3D CAD for everything we sell now.
Finally, I want to give a huge shout out to my man George Slezak! We've been working with George to do the Eagle to Altium conversions and generate 3D CAD from the resulting files. This would not have happened without his help. George has been incredible to work with. If you need an Ace Mechanical Engineer to help you out we cannot recommend him enough!
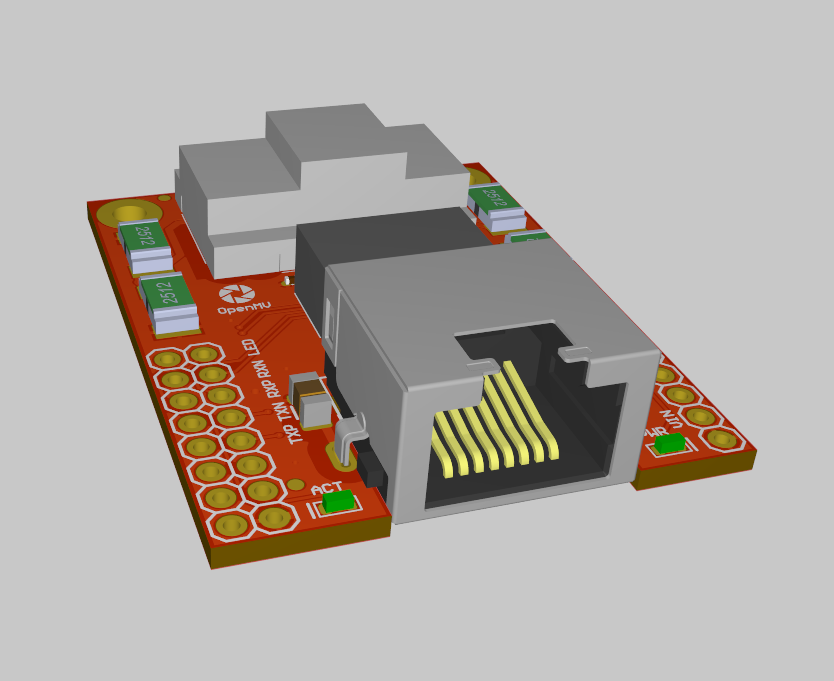
The PoE Shield is Finally Here!
That's right! We paid for production of the seven shields I promised for the OpenMV Cam RT1062 and the PoE shield is finally in stock! With the PoE shield you can now trivially get your OpenMV Cam RT1062 online and power it at the same time. The PoE shield works through the same MicroPython sockets interface as WiFi. So, you just need to change which network adapter is used to connect and you'll be online. Best of all, the RT1062 does a much better job streaming high resolution JPEGs via our RTSP scripts with the PoE shield. Buy it now and give it a try!
As for the rest of the shields, they are in production now and will be on sale soon. We've already completed the product pages for them so once we get stock we'll be able to launch them too.
QWIIC Shield here too
We also are now stocking a super cheap QWIIC Shield which can be used to connect your OpenMV Cam to QWIIC devices from SparkFun.
While not a game changing amount of new functionality, still, very useful to make your life easier.
Firmware v4.5.4 Released
And finally! We released firmware v4.5.4. We mostly fixed bugs in this new firmware release. However, it contains the new RTSP streaming fixes that make our code work with VLC now. So, you shouldn't see any more issues with OpenMV Cams streaming MJPEG video using the RTSP protocol. We will also be getting updates done soon to in order to make MJPEG web browser streaming better too.
Last but not least, erode()/dilate()/open()/close()/black_hat()/top_hat() got a huge performance boost using Cortex-SIMD (which applies to all OpenMV Cams). They are now literally 150% and 50% faster for Grayscale and RGB565 respectively. This number will only go higher on Cortex-M55 based platforms where we expect to see additional 4x performance gains for Grayscale and RGB565 image processing.
Last week I attended NIVIDIA's GTC and it was amazing! It was super exciting to see so many folks gathering together again! I remember first learning about NIVIDIA back when I was a high school student saving up to buy a GeForce 6600 to play Guild Wars. It's crazy to see what their technology is capable of doing now.
Anyway, so, what's been happening with OpenMV?
Production Updates
We've sent the PoE, Driver, Servo, Relay, RS422/RS485, and RS232/CAN shields to manufacturing! So, we hope to have things in stock shortly. The PoE Shield will be available first. And, like the RT1062, we're taking high quality pictures of all the new shields and will have 3D CAD available for all of them too.
Firmware Updates
In our most recent Development Firmware Release we finally fixed VLC RTSP streaming support. So, you should now be able to stream MJPEG video via RTSP to VLC, FFPMEG, OpenCV, and any application that accepts JPEG streams. In particular, the fix was to explicitly force YUV422 encoding. You can do this now with compress() by passing subsampling=image.JPEG_SUBSAMPLING_422. This should also fix browser MJPEG streaming for various clients too.
We're a Vision Tank Semi-Finalist
Thank you everyone for voting for us for the Embedded Vision Summit Vision Tank! Hopefully, we'll be selected as a finalist for the Embedded Vision Summit! You can see all of the Semi-Finalists here and you can watch our Pitch Video Below:
Finally! I'll be on OpenCV Live this Thursday (March 28th) at 9am PST talking about OpenMV Cam. You can watch via Zoom or YouTube. Please tune in!
That's all folks!
]]>
https://openmv.io/blogs/news/back-to-normal-operation2024-03-07T14:07:15-08:002024-03-07T14:15:48-08:00Back to Normal OperationKwabena Agyeman
Hey Folks!
It's been a month since our last update. Time for the new one!
We're back to Normal Operation
Behind the scenes, you may have not known this, but, we had a huge backlog of orders to clear out that had been sitting for... years. Anyway, we've finally shipped everything now and are back to normal operation with orders waiting less than a week to ship. So, the effects of the chip shortage on us have finally passed!
Now, if you want to buy anything you can expect it to ship quickly. As for distribution, we are working on pushing stock out through all our channels now and hope to have more progress on that as the year goes on.
Store Updates
Also, you may not have noticed, but, the new store is less glitchy too now. We've got a team actively working on improving things and hope to roll out some more updates to the store soon to make it easier to navigate and quickly find any information you need.
To this point, we have also been porting all our old Eagle designs to Altium. As of last week almost all of our of shields, base boards, and camera sensor modules have been ported. Once we finish the porting process we'll start to link the Altium designs in the store and add 3D model support like we did for the RT1062.
Firmware v4.5.3 Released!
Finally, we spent the last two months mainly focusing on delivering on the RT1062 Product and making sure it's performance was competitive with the H7 Plus. This is now the case! We finished the camera sensor driver for it which unlocks JPEG streaming support from the OV5640 along with adding DMA offloading. The DMA offloading in particular unlocks a massive 47% performance boost for all algorithms. We additionally, have another across-the-board 7% performance boost coming soon too.
You can find the list of changes here for firmware v4.5.3. We probably worked a little too long on the firmware before releasing it. But, anyways, it's now finally official! Also, we finally have machine module examples for board control on the RT1062!
Other notable features:
We enabled more TensorFlow operators on all cameras and finally fixed the bug that causes the system to crash on loading an unsupported model. Thanks Ibrahim!
And for the RT1062 we enabled all possible supported operators.
All line ops have been optimized using Cortex-M SIMD. This unlocks 15% speedups across the board for binary and math operations.
We also have Cortex-M SIMD optimizations coming for erode/dilate soon which provide a 30% speedup for RGB565 and 150%!!! speed ups for Grayscale Images. The same technique used for making erode/dilate faster can be used to improve mean() and friends too for future firmware releases.
Anyway, please see the release notes above for all the changes. There are a lot. The focus for this month will be IDE work next. So, things will slow down on the firmware side of things. But, I'll be back to pushing performance improvements in April.
It's been two weeks, time for a blog post! Here's what's going on:
1080p Video Recording on the OpenMV Cam RT1062
We got a customer email asking about if we could record 1080p video on the OpenMV Cam RT1062. So, I decided to show that we can easily do it using the OV5640 on the OpenMV Cam RT1062!
This feature depends on the latest un-released firmware for your OpenMV Cam (v4.5.3) which you can install via Tools -> Install Latest Development Release. You can record/stream 1080p video at 15 FPS or 720p video at 30 FPS in JPEG mode. Note: You can also use JPEG mode with RTSP video streaming!
So, give it a try! Turn your OpenMV Cam RT1062 into a video recording machine. Thanks to the 30uA low-power mode you can wakeup on the RTC, record/stream video, and then turn back off while running forever on a battery.
Production Shield Prototypes Received
We finally got our RT1062 production shield prototypes back from the factory! We're going to thoroughly test them all now to make sure everything is in working order and that they are ready to mass produce. We plan to launch the 10/100 Mb/s PoE Ethernet Shield for the RT1062 first as this is what folks have asked the most about.
The other shields pictured above from left to right and top to bottom:
The PIR Shield:
It features a 6uA PIR sensor that can wakeup your OpenMV Cam RT1062 from deep sleep and PWM controllable IR (8) and White (8) LEDs. The 850nm IR LEDs can output ~60 mW/sr combined and the White LEDs can output ~200 lumens combined - seriously bright!
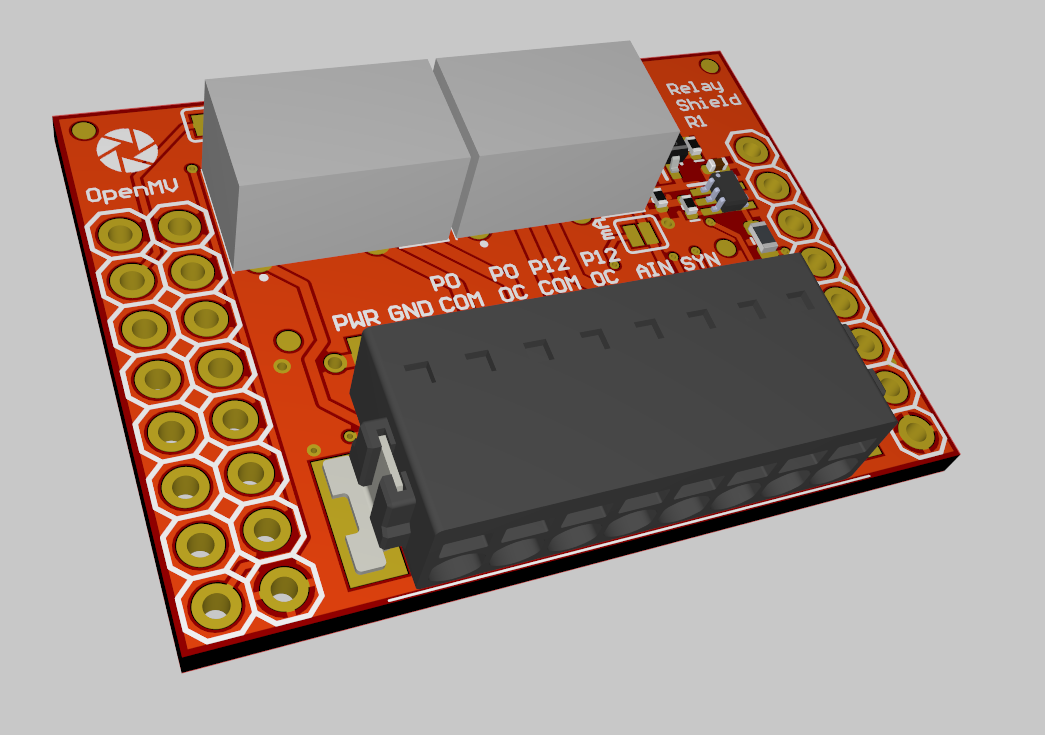
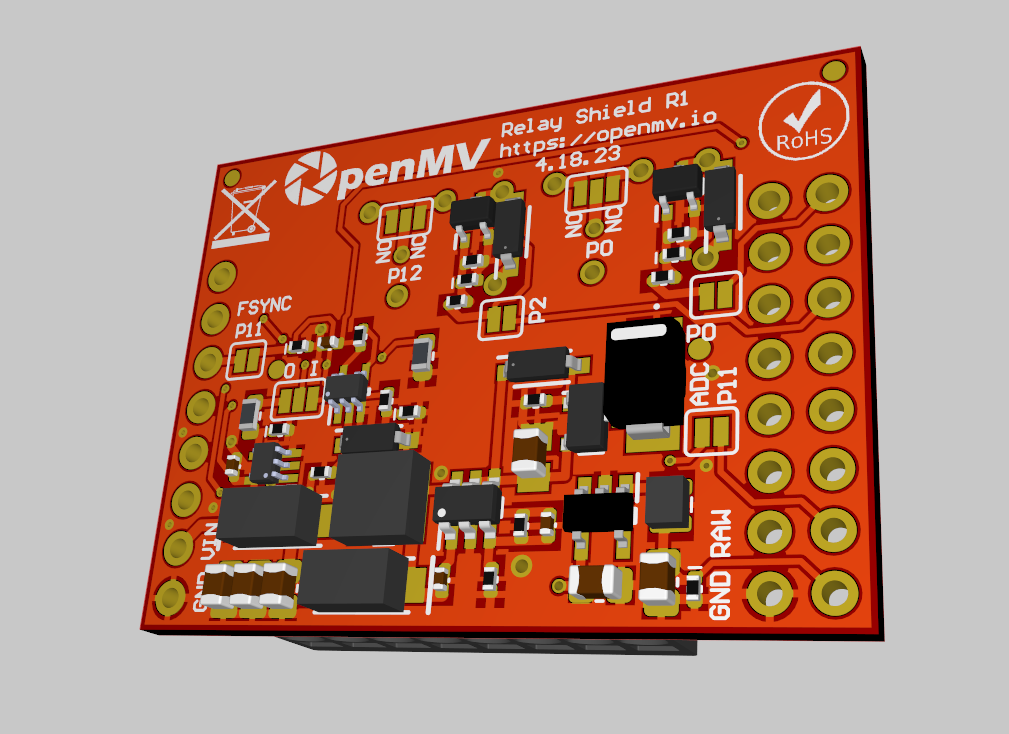
The Relay Shield:
It features two 60W capable Small Signal SPDT Relays that you can use to pass DC or AC signals. Additionally, it includes standard features like a wide voltage range 6V-36V power supply input, protected analog in, and sync input/output for triggering.
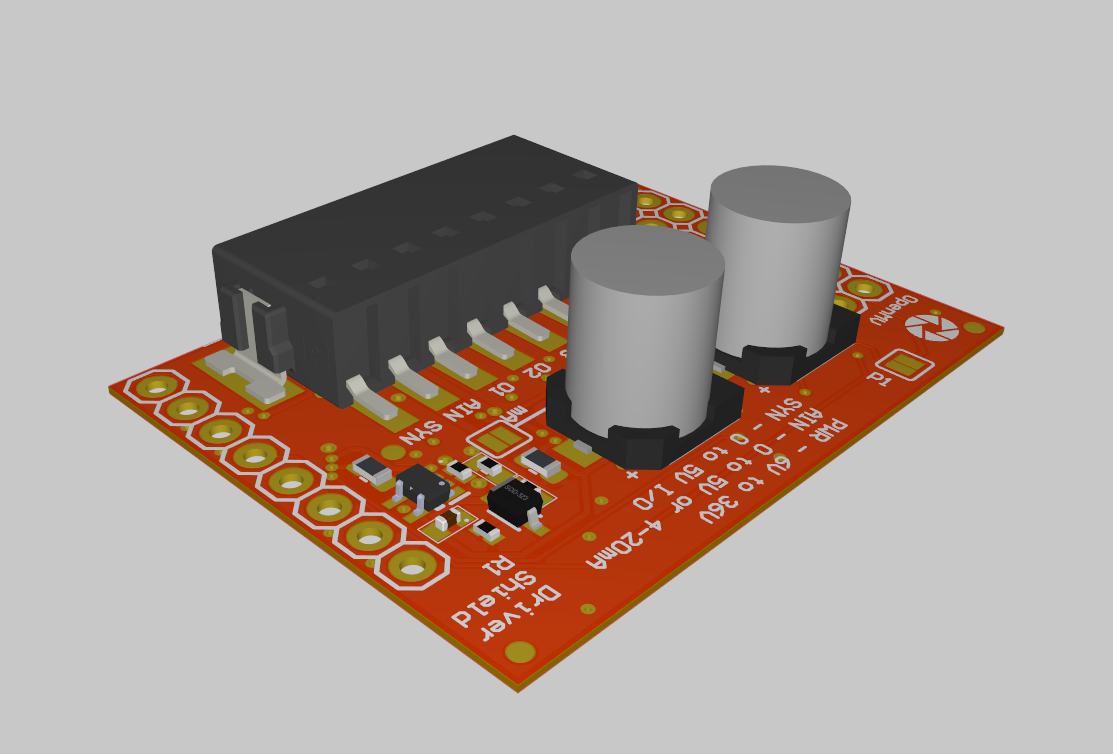
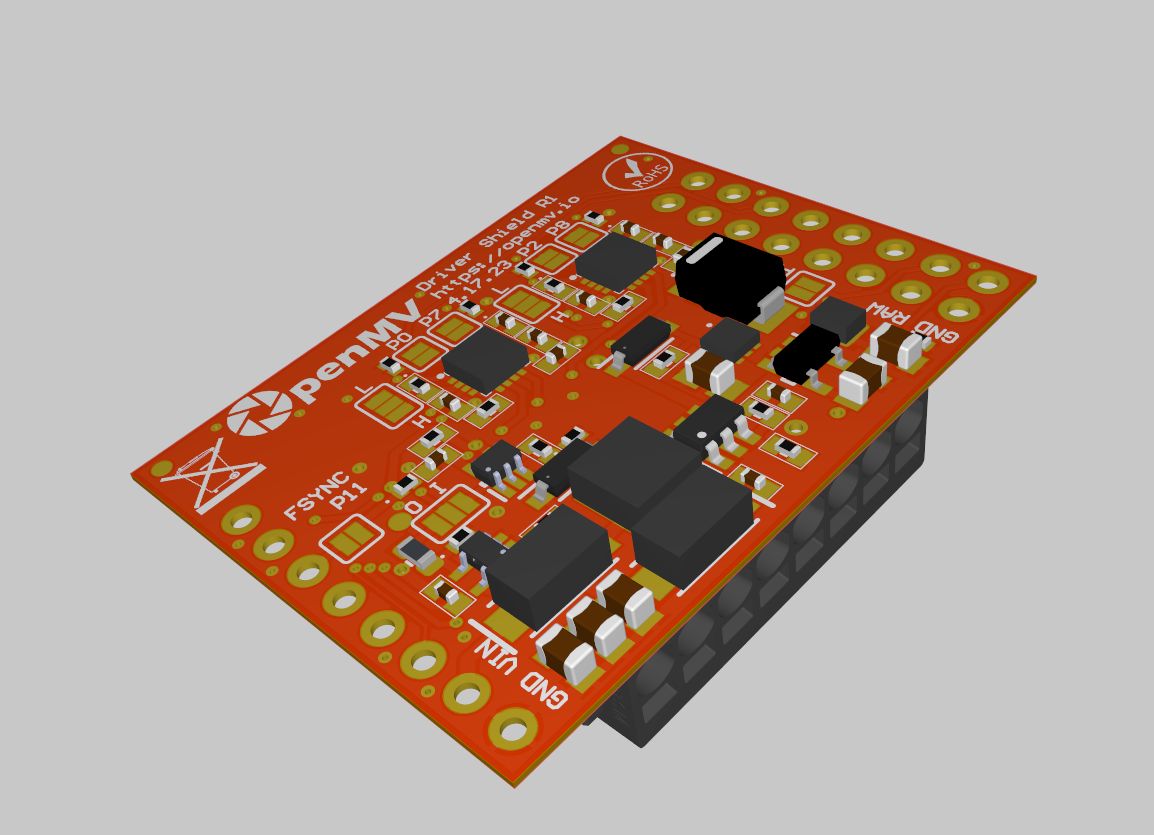
The Driver Shield:
It features two 3A H-Bridge Motor Drivers which can be used to drive motors or act as four individual 1.5A push-pull outputs. Additionally, it includes standard features like a wide voltage range 6V-36V power supply input which the high power outputs run off of, and protected analog in, and sync input/output for triggering.
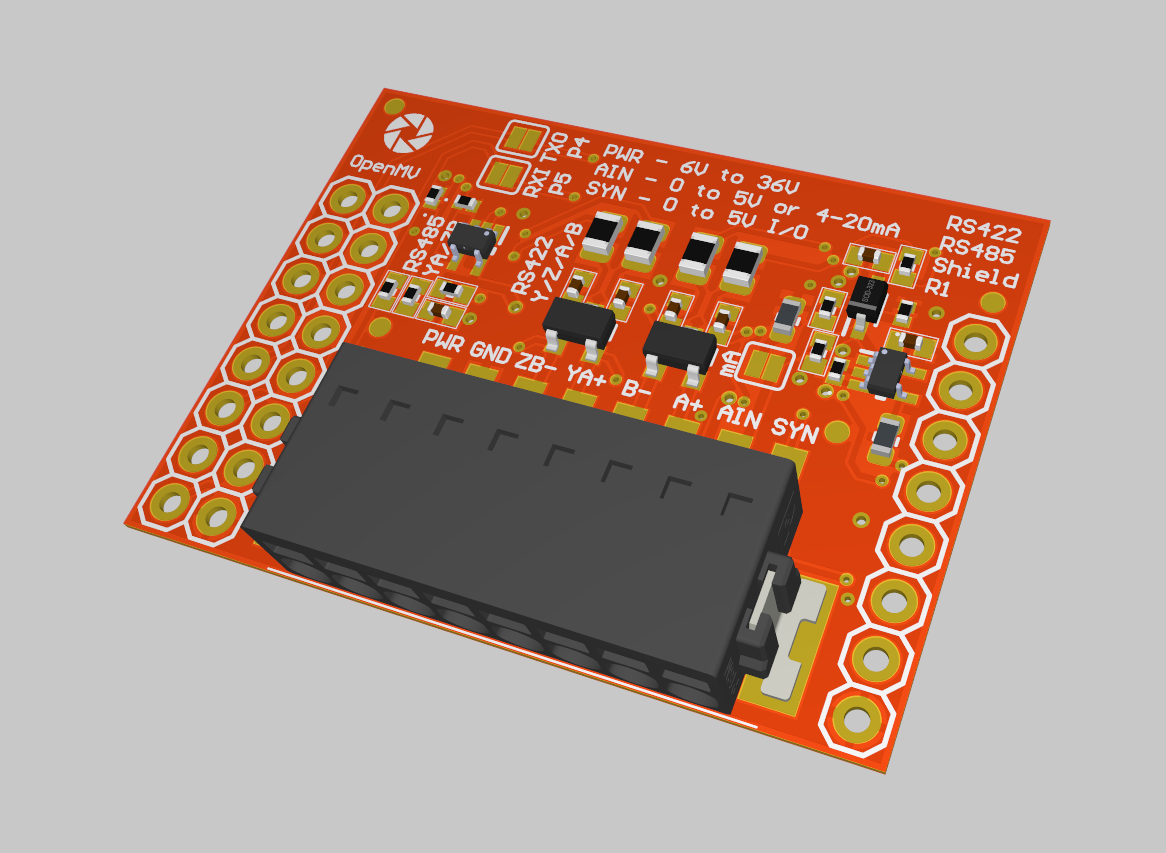
The RS422/RS485 Shield:
It features a single RS422 or RS485 driver cable of 10 Mb/s. Additionally, it includes standard features like a wide voltage range 6V-36V power supply input, protected analog in, and sync input/output for triggering.
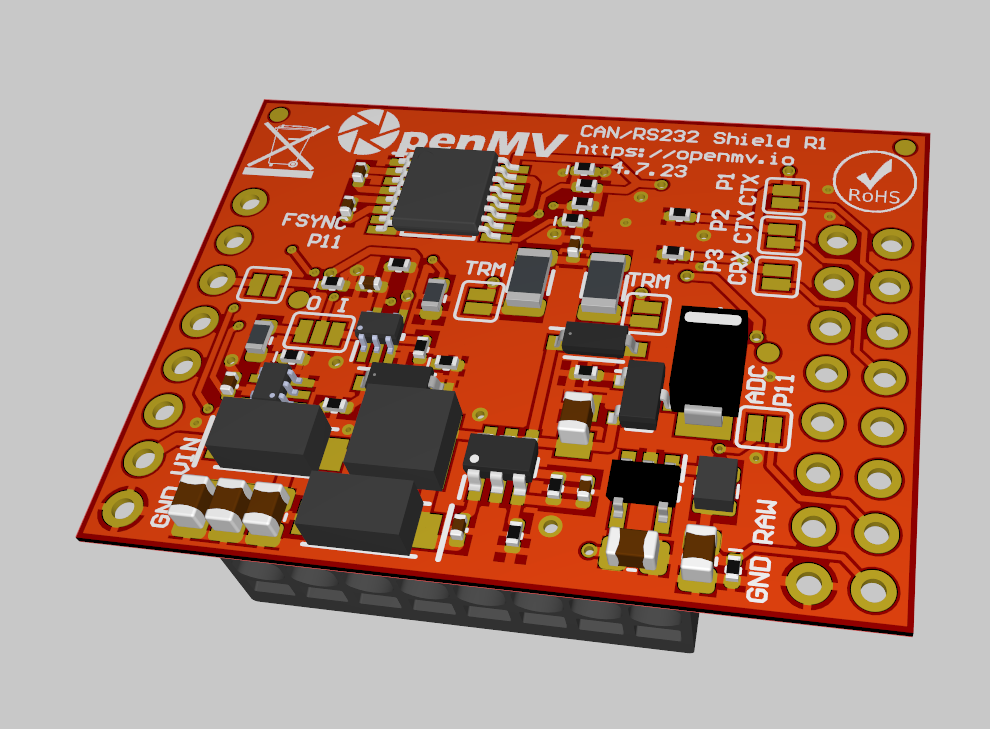
The CAN/RS232 Shield:
It features an 8 Mb/s FD-CAN Transceiver and a 1 Mb/s RS232 Transceiver. Additionally, it includes standard features like a wide voltage range 6V-36V power supply input, protected analog in and, sync input/output for triggering.
The New Servo Shield:
It features three Servo Outputs on P7-P9 and allows P10 to be used as a sync input/output for triggering.Additionally, it includes standard features like a wide voltage range 6V-36V power supply input which can power the OpenMV Cam and servos, and protected analog in.
In summary, a lot of new features to help you interface your OpenMV Cam RT1062 to the real world!
Thanks to Arm we're going to be speeding up many algorithms across the board using Cortex-M4/M7 SIMD which allows you to double pump most code giving a 2x performance boost and implementing Arm Helium support for the Cortex-M55 and Cortex-M85 to get 8x to 16x more performance from the baseline.
We're going to be bringing the speed on future OpenMV Cams. With the Cortex-M55/M85 we're going HD. 320x240 no more! 1280x720 or 1280x960 by default - leeeeettttts go!
Lens Correction
Out of the many algorithms Arm wants us to optimize, the most significant one they are interested in is for us to implement real lens correction like OpenCV has!
So, we're finally going to get it done this year and implement a general purpose remap function supports nearest neighbor, bilinear, and bicubic scaling. The new remap function will work from a generic lookup table that can be pre-computed before you start streaming frames or on every frame. You'll then be able to use the generic lookup table to apply lens correction, log polar transforms, perspective transformations, and more!
The new code will be much faster and better looking than what we are doing right now where as we currently compute the mapping function for our lens correction code or log polar transform every frame and only have nearest neighbor scaling.
But, we're going to make this work for all OpenMV Cams, even those without external SDRAM. We'll allow you to store the generic lookup table at a different (e.g. lower) resolution than the frame buffer that you are transforming. Using fast bilinear scaling we're going to generate interpolated remap coordinates on the fly. This will allow you to use lens correction on your OpenMV Cam H7 with a 80x60 remap table to remap a 320x240 image for example.
Why is this Important?
Pretty much anyone using computer vision in serious applications applies lens correction to remove distortion effects from the image which typically will make all the lines straight. Doing this before running QR Code detection, for example, will vastly improve the detection performance.
Similarly, if you're using your OpenMV Cam to follow lines you'd then want to apply a birds-eye view perspective transform after applying lens correction to make it easier to follow the line on the ground.
So, with the new remap functionality you'll be able to apply both transforms at the same time, using a faster method, and with higher image quality.
Future Stuff
We're going to be working with Arm closely this year on a few projects. We'll announce more details when we have them. In the mean-time, that's all folks!
]]>
https://openmv.io/blogs/news/fun-with-avi-files2024-01-15T17:03:23-08:002024-01-16T09:57:07-08:00Fun with AVI FilesKwabena Agyeman
Hi Folks!
We're starting the new year off right with something fun for everyone! Hardware JPEG decompressor support for the STM32 was just merged into main. This allows you to now playback MJPEG files!
While not particularly useful for machine vision playing back MJPEG files is a nice to have though. Anyway, you can read more about how to play your own videos yourself on the forums here.
Nominate Us for the Vision Tank!
OpenMV applied to the Embedded Vision Summit Vision Tank this year! We could use your help being nominated for the competition. Winning will give us much needed publicity! Please nominate us here!
C.J. Woodman, Ridlon, A., Brightsmith, D.J. (2022) Predicting hatching dates for avian species using infrared cameras and machine learning models, 2022 National Veterinary Scholars Symposium, poster presented by Ashley Ridlon, August 5, 2022.
]]>
https://openmv.io/blogs/news/goodbye-2023-hello-20242023-12-31T13:05:42-08:002023-12-31T14:11:04-08:00Goodbye 2023! Hello 2024!Kwabena Agyeman
Hi Everyone!
HAPPY NEW YEAR!!!
It's been a long year, with many ups and downs, for me at the beginning of this year I was working at Embark Trucks full-time as an Engineering Manager. However, this was not to be, instead it was time for me to go full-time on OpenMV. Since then Ibrahim and me and have been able to start building up OpenMV again. So, let's recap the big things we were able to deliver this year!
#1 - Launching the OpenMV Cam RT1062
It was an was an incredible amount of work to design the new OpenMV Cam RT1062 platform. We had to port all our software to run on a new non-STM32 based processor. This meant new drivers for almost everything. Furthermore, the OpenMV Cam RT1062 is our most advanced OpenMV Cam with multiple high speed interfaces so you can actually get data out of your OpenMV Cam to the world. We're super excited for 2024 and how we can build on the platform in the future with new shields and camera modules.
#2 - OpenMV IDE 4.0
Launching OpenMV IDE 4.0 took months of work to update the IDE from Qt 5x to Qt 6x and QtCreator 4 to QtCreator 10. As you can imagine, it took more than a week before the code would even compile. However, we got it done! Also, by embracing GitHub actions we're now able to build the IDE in the cloud off of any commit greatly accelerating our ability to delivery bug fixes and new features to customers.
#3 - A Fresh New Website
Like OpenMV IDE, we hadn't updated the website in 7 years too. Since then so much has changed. So, it was time to get onboard with a new Shopify 2.0 website. If you haven't taken a peak yet, we've got a lot more videos now to tell the OpenMV story. Wow!
#4 - OpenMV Cam H7 Plus Back In Stock
Like mana from heaven, we finally got our order of 5K STM32H743IIK6 chips to build more OpenMV Cam H7 Pluses this year - our best selling OpenMV Cam. A lot of things came together to make delivering more OpenMV Cam H7 Pluses possible. I want to give a huge shoutout to Etonnet, our contract manufacturer, for working with us on delivering more OpenMV Cam H7 Pluses.
#5 - And Finally, Shipping, lots of Shipping
While not externally visible, we had a huge backlog of orders on our books. Some that had been languishing for literally years. We are incredibly happy that we were able to wipe this out thanks to being able to get back in stock. Last month we shipped hundreds of orders completely clearing out our backlog so we can start fresh in 2024!
Now for some Metrics
I was looking around in our analytics last month while dealing with our shipping backlog and I saw a very interesting number. There are over 80,000 registered OpenMV Cam's in the world! Woah! It looks like we're going somewhere with this idea. After you add in all the clones of our product out there we're talking about over 100,000 OpenMV Cams running around in the wild!
But, it makes sense, we passed the 10,000 threshold mark on our email list. It's crazy hitting this number. People want OpenMV. So, we're going to continue to work hard to bring it in 2024.
So, here's what we plan to get out the door early in the new year:
#1 - OpenMV IDE Viewer
Have you ever wanted to use OpenMV IDE as your product's user interface? Well, we hear you! We're going to be rolling a stripped down version of OpenMV IDE soon that just includes the viewing features in OpenMV IDE. This will allow you to deploy an application based on your OpenMV Cam and have desktop software for Windows, Mac, and Linux to talk to it.
But, wait, there's more!
We're also going to be rolling out configurable user settings built into OpenMV IDE Viewer (and OpenMV IDE) which will allow you to share .json config files back and forth with your camera and the IDE. The .json file will tell the IDE the schema for config settings and whatnot to display via a GUI in OpenMV IDE Viewer (and OpenMV IDE). With this new feature you'll be able to easy create user interfaces!
Note, this feature is for editing static config settings loaded by your OpenMV Cam powered product on startup.
And Finally - White Labeling OpenMV IDE Viewer
This is one of those non-obvious ideas. But, it's clear what folks want. To be able to deploy a product based on the OpenMV Cam with your own user interface. So, we're going to make that easy for you by allowing you to White-Label OpenMV IDE Viewer with your own logos, and etc. This is going to be a game changer for folks building products based on the OpenMV Cam.
#2 - New Camera Modules
We announced this before. But, we're going to bring new camera modules based on OnSemi's AR sensors to the market. We've prototyped six modules as we said we're going to do. We just need to get the driver software done before we can bring them to market.
#3 - New Shields
We also announced this before. We've got a bunch of new shields for the OpenMV Cam RT1062 designed and we're just waiting on sample protypes that we should get early next year before we can start bringing them to market. We've already worked through pricing with our contract manufacturer and we'll be ready to pull the trigger soon on production after we verify the samples work.
Finally, and more!
Of course, we've got a lot more cooking behind the scenes too! What I just mentioned were lagging items we wanted to delivery in 2023. We're working on a lot more for 2024. Anyway, I don't need to make this email any longer. So...
]]>
https://openmv.io/blogs/news/new-website-and-h7-plus-in-stock2023-12-18T19:12:01-08:002023-12-18T19:19:24-08:00New Website and H7 Plus in Stock!Kwabena Agyeman
Hi folks,
We did it! The entire OpenMV Cam RT1062 backlog has been shipped! We just have a few more orders left in our queue to get out the door before putting the past of the chip-shortage behind us!
OpenMV Cam H7 Plus In Stock
Additionally, our contract manufacturer has finished up 1K OpenMV Cam H7 Pluses from the 5K we ordered and has made them available to our drop shipper. So, I've brought the OpenMV Cam H7 Plus back in-stock!!!
There's still going to be a little bit of a delay shipping it thanks to it being the end of the year and DHL shipping backlogs... but, we have real inventory now. Units were produced without issue.
Last, if you haven't visited OpenMV in the last week take a look now! We just updated to a new Shopify 2.0 store powered by the Brava Theme - the goal was to make things big and bold!
We can now put videos anywhere on the website (which we may have overused), embed Altium 365 PCB Viewers on product pages, and much more! Shopify's new 2.0 store theme allows us to create page templates that can be applied per product type so we can display what makes sense for each product differently.
Anyway, there's a heaping helping of bugs with the new site, we've got a five page long list of issues that will get resolved in the new year. But, the website works well enough for now to be launched!
]]>
https://openmv.io/blogs/news/openmv-cam-rt1062-h7-plus-ide-firmware-updates-and-more2023-12-03T10:25:32-08:002023-12-11T13:24:49-08:00OpenMV Cam RT1062, H7 Plus, and more!Kwabena Agyeman
Hi all,
We finally shipped out half of our order backlog! OpenMV Cam RT1062's are on their way now! Hopefully, we should be able to clear out the remainder of our backlog over next week. Also, the OpenMV Cam RT1062 is now in stock on the online store and available to purchase!
As mentioned before, we are sampling second-revision versions of shields for the OpenMV Cam RT1062, which we will be able to roll out next year.
As for the 5000 OpenMV Cam H7 Plus units we are building, the factory has completed about 20% of the order so far and will start making partial shipments to our shipping warehouse soon. We expect to be able to start shipping OpenMV Cam H7 Plus units in about two weeks. Once we have them in stock, we will allow you to purchase them again.
OpenMV IDE and Firmware Updates
Other than getting units back in stock, we were working hard on firmware and software updates. Here's what's new:
OpenMV IDE Example Filtering
With the latest release of OpenMV IDE, we significantly improved the user experience with our examples. The IDE now filters examples by the connected board and sensor type. Now, only what is relevant and runnable on your OpenMV Cam is shown (there's a checkbox under tools to see everything if you want, though).
OpenMV IDE Focus Metric
Ever wanted to know how sharply focused your lens was? Now, OpenMV IDE displays a focus metric heuristic of the whole scene or selected area in the frame buffer. How do we compute a focus metric? By JPEG compression! It turns out that the JPEG file size produced by an image is more or less correlated to how sharp the image is. Anyway, OpenMV IDE now displays a score on how sharp your image is. Use this feature to get your focus to the best it can be.
MP Parse All Support Added to most OpenMV Functions
Have you ever passed a keyword argument to a function, and nothing happened because you misspelled the argument? Well, not anymore. You're going to get an error now! Ibrahim spent the last couple of weeks updating quite literally hundreds of functions in our firmware to use MicroPython's Parse All function which detects if there are errant unused keyword arguments and lets you know your code is bad instead of silently ignoring the issue.
But, we've still got a lot of work to do. We updated everything but the image module, which we will start on next after some refactoring work on it.
Fun with Transpose
Our draw_image() backend has been improved to support transpose in addition to hmirror and vflip! Using combinations of these flags you can now rotate images by 90, 180, and 270 degrees.
We improved support here for the Arduino Giga, which has a screen that's rotated by 90 degrees. Originally, transpose on images was only available via our set/assign/replace operator. However, now with it built into our draw_image() backend, transpose is now available for many different functions.
It took some effort to make this feature work well. While the concept behind transpose is simple, swap x and y pixel locations, it turns out that this is incredibly harsh on memory data access. Doing a transpose of an image brings SDRAM to its knees.
So, how did we overcome this? Well, it turns out the processor SRAM can be used as a cache. So, we transpose an image in SDRAM by splitting it into chunks which can be written to SRAM. This allows us to use fast row access on the image in SDRAM while writing it via columns into SRAM (this is the expensive operation... one pixel per row - e.g. a column) before writing back out the columns as rows into SDRAM.
Couldn't follow that? Doesn't matter, all you need to know is that we got a 5X (which is huge) performance improvement by doing this. This means transpose is so fast now it's pretty much free to use - meaning image rotations by 90, 180, and 270 are now free to use.
Smart Scaling Too
But, that's not all, the draw_image() backend now supports scaling hints to simplify drawing scaled images too. We added the hints CENTER, SCALE_ASPECT_KEEP, SCALE_ASPECT_EXPAND, and SCALE_ASPECT_IGNORE.
CENTER allows you to center an image being draw on another image or canvas.
SCALE_ASPECT_KEEP will then scale that image to fit inside another image or canvas.
Or, if you want to fill the image completely and don't care about cropping, you can use SCALE_ASPECT_EXPAND.
Finally, SCALE_ASPECT_IGNORE is available for folks who just want to scale an image up while ignoring the aspect ratio blindly (this will stretch the image, though).
And Finally, In Function Image Loading
And last but not least, Ibrahim refactored our file management code which had not been touched much since the old M4 days. We now support directly drawing images on other images and displays via a file path. E.g.
Which will display the Arduino logo centered, scaled, and rotated directly from a file path on the Arduino Giga's screen.
Just think about how much code is running under the hood to make the above one function call.
As we build out the draw_image() backend, we plan to add ARGB8888 support too, so you can handle PNGs with alpha layers to blend logos onto live video.
Also, if there's demand, we can actually make almost any function accept a file path now for its image source. However, we don't want to encourage terrible code, so we will not add this feature everywhere except where it makes sense. From a performance standpoint, using the disk as RAM is not a great idea. Since we're an MCU, we don't buffer the file system in RAM like Linux does. So, you don't want to use image file path loading in a loop if you care about performance.
For European Business Customers who placed orders, we need your EORI/VAT number. If you are waiting for an order to ship please email us with this info now along with your name and order number. We will email you also if we don't have this information. However, your order will be delayed until we have it as it's required for customs clearance. Please email this information to shipping@openmv.io.
For all other customers, if you believe there is any tax information you think we need to apply to your order before we can ship it please let us know too. E.g. South Korea customers now have to provide a personal customs clearance code. Like above, we will email you if we need more information to ship your order. But, if you already know that we will need this information please email us with it now to avoid delays.
As mentioned before please email this Information to shipping@openmv.io along with your name and order number.
Finally, we are working on a website update that will include a form to capture this information. However, until that is rolled out we have to do this manually.
OpenMV Cam H7 Plus Update
Our contract manufacturer let us know that 5K OpenMV Cam H7 Plus units have completed SMT PCB assembly for the baseboard and camera module. The units are now being tested and assembled now. So, we should be able to start shipping them by mid-December.
Thanks,
]]>
https://openmv.io/blogs/news/the-openmv-rt1062-is-shipping-finally2023-11-28T17:18:28-08:002023-12-11T15:55:18-08:00The OpenMV RT1062 Is Shipping FinallyKwabena Agyeman
Hi Everyone!
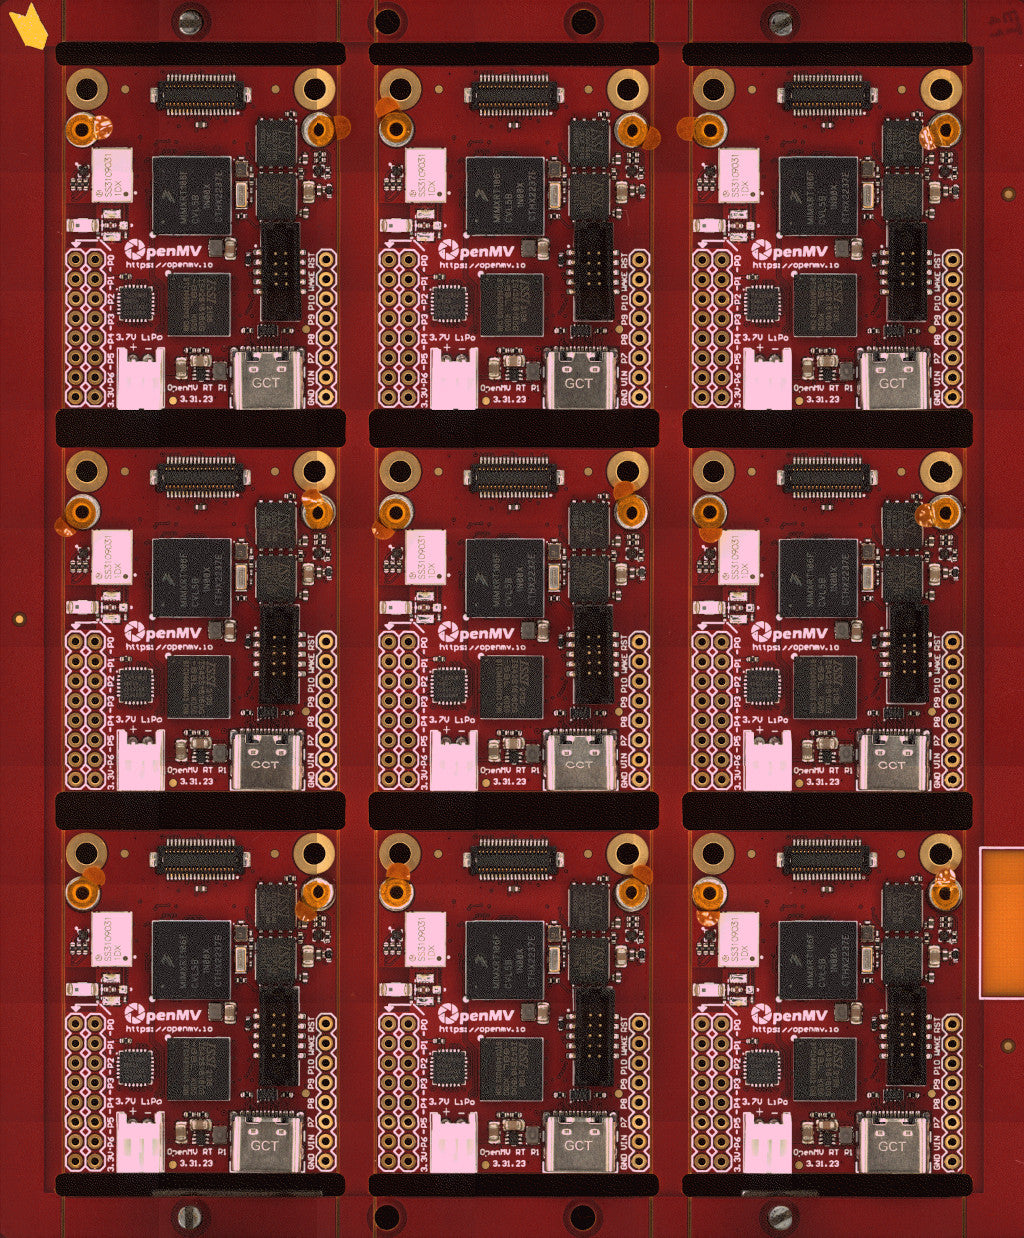
It's taken a long time to get here since March, but, we are finally shipping new product! The boxes above account for 1300 cameras. We've sent 1600 units to the shipping warehouse so far and are finishing up the remaining 900 units out of the total 2500 being produced.
Anyway, we've got a few hundred orders to get out the door now. So, our shipping warehouse is packing orders right now and will start sending out shipments starting on Friday. If you have an order placed it should get on it's way over the weekend and through next week.
What about the new Shields?
Glad you asked! We've kicked off final prototype samples for all new shields with our contract manufacturer already and hope to have samples back in December. We will start building out small production builds of the new shields one after another based on what's most pressing to provide. Most likely we will offer the PoE Ethernet and PIR Shield first as these show off the new abilities of the OpenMV Cam RT1062.
What about the new Global Shutter and HDR camera modules?
We've kicked off prototype samples of all the new sensors. There's quite a bit of driver development work that has to be done to make them operational after we receive the parts. So, it will take more time before these new products are available for sale.
When is the OpenMV Cam H7 Plus coming back in stock?
We've already approved the order so our contract manufacturer will start production right after the OpenMV Cam RT1062 is finished being built. We are building 5000 units of the OpenMV Cam H7 Plus. Also, these units will work with the new camera modules (even the OpenMV Cam H7 too, however, we may have to disable the driver in our firmware by default pending flash space available).
What else?
Nothing, that's all folks! Except for... we are working on a new firmware release, documentation, and an IDE update. But, this is always the case.
...
And... we have a new website design we are working on that will launch soon. Better layout, videos in webpages, 3D models, step files for everything, Altium 365 schematic/pcb on product pages, and more. Stay tuned!
]]>
https://openmv.io/blogs/news/openmv-cam-rt1062-manufacturing-now2023-10-31T12:34:29-07:002023-12-11T15:54:35-08:00OpenMV Cam RT1062 Manufacturing Now!Kwabena Agyeman
Hi All!
We are producing the OpenMV Cam RT1062 now and moving forward toward shipping soon!
It took a while for production to get started as we had to wait a bit for parts to get through customs. However, we are building 2500 units now and will start shipping finally in November.
I know it's taken a looonnnggg time to get back in stock, but we're close to shipping cameras now. Thank you for your patience!
More Good News
Arrow, finally notified us that our order of 5K STM32H743IIK6 chips will finally be delivered! Previously, they had told us in March of this year (after moving it from December last year), then moved it to December this year, and then moved it to May of next year.
We have had everything set to go to produce 5K of the H7 Plus forever now but have been waiting on these chips indefinitely. The reason for building the OpenMV Cam RT1062 was to get around this chip shortage so we could get back into production.
So, it looks like we will have the OpenMV Cam H7 Plus back in stock soon too. That said, we will not be opening up pre-orders for this camera until we have stock in hand and ready to ship. More shenanigans could ensue... but, we believe the imminent delivery of these chips is real now.
As for future production plans beyond the 5K we have parts to build with, SingTown has notified us that they are willing to resell through us to keep the system (along with the H7 R2) in stock as long as there is market demand.
Around the Web
Finally, @iforce2d found our OpenMV Cam H7 and has been using it to create a precision image capture system for a pick-and-place machine he wants to build using our global shutter image sensor! Checkout his video below:
Anyway, that's all folks!
]]>
https://openmv.io/blogs/news/openmv-cam-rt1062-approved-for-production2023-09-18T16:14:54-07:002023-12-11T15:53:58-08:00OpenMV Cam RT1062 Approved for Production!Kwabena Agyeman
Hi Folks!
Great news this time! The OpenMV Cam RT1062 has been approved for mass production!!!
Our Rev4 prototypes have passed all tests and work perfectly. They go down to 30uA out of the box in low-power mode, the SD card reliably works, and you can switch between power supplies on-the-go while the camera is actively running! All of these things were an issue with our Rev3 boards.
Side note, USB file transfer now runs at 10MB/s! 10x faster than our previous generation of OpenMV Cams! You can also easily hit 20 MB/s writing to the disk using the ImageIO class. There's more optimization work to-do to get that performance everywhere. But, we're starting to put up real numbers nowadays.
So, we've let our CM know and they are now gearing up to start mass production and are ordering parts for 2500 units. I don't have exact timelines yet for when we can start shipping, but, we should be able to finish production in late October and start shipping right afterwards.
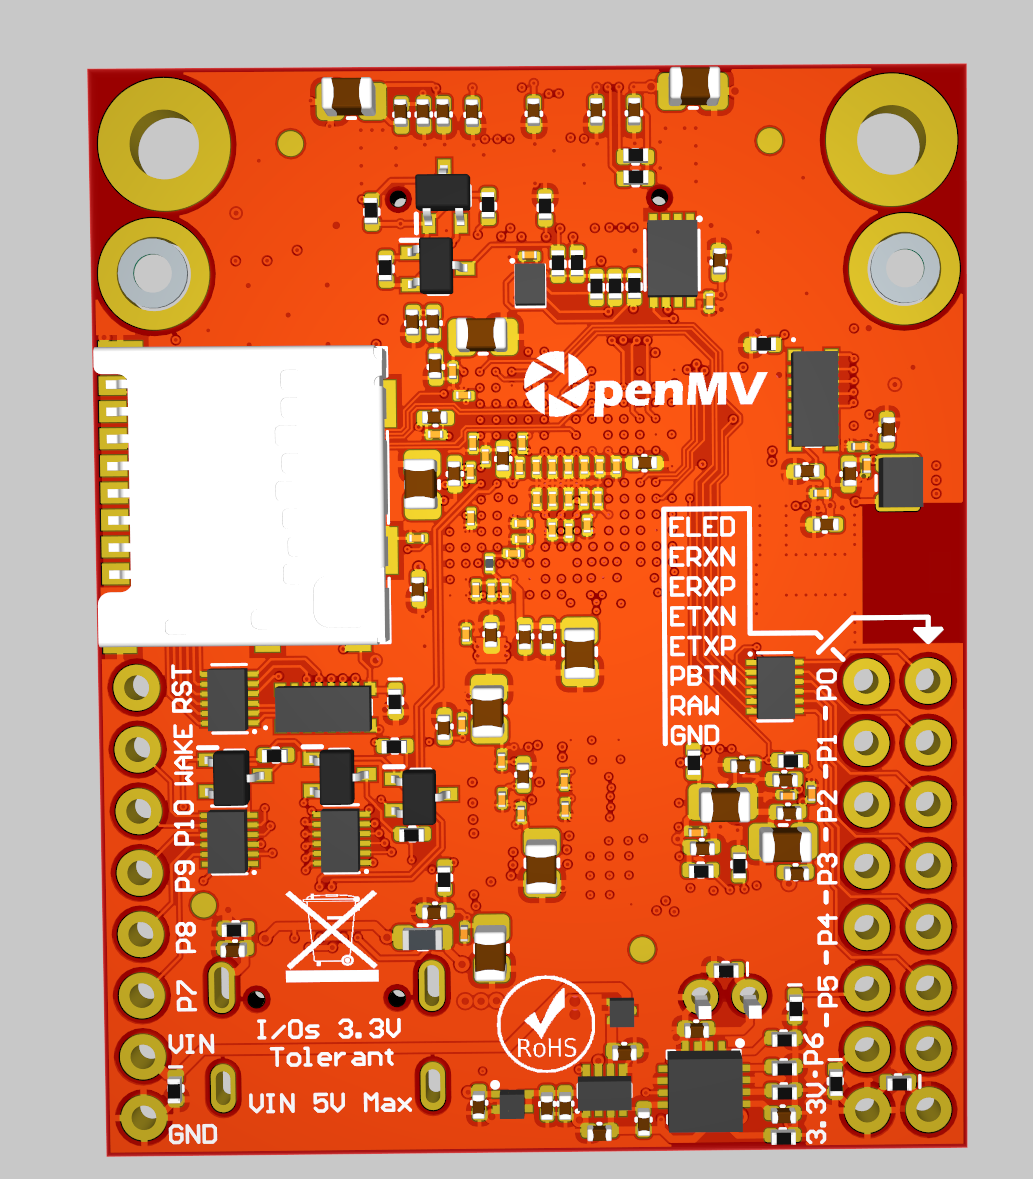
I know that it has taken half a year to get these units out the door, but, thank you for waiting patiently. Switching to a new MCU was not easy. But, thanks to the extra time while waiting for hardware prototypes we should have all drivers operational at the highest level by the time we start shipping. This is our first professionally engineered design that uses every single I/O pin on the MCU and that actually achieves a real-low power envelope making it useful in battery powered applications. Even more so, it has WiFi, Bluetooth, and Ethernet onboard giving you actual comms to connect to the world.
And last but not least, there's JTAG onboard, so, you can single step debug it if you want to change the code onboard. So... it's like a real dev board. Amazing!
OpenMV around the Web
Anton from Anton's Mindstorms loves using the OpenMV Cam with Legos. He sent us a message earlier this month by sharing some of his projects with us:
]]>
https://openmv.io/blogs/news/final-rt1062-prototypes-sent-to-fab2023-08-15T17:42:48-07:002023-12-11T18:15:00-08:00Final RT1062 Prototypes Sent to FabKwabena Agyeman
Hi Everyone!
Just a few updates for today. The last two weeks were spent verifying our Rev 2 RT1062 PCBs (the correct ones we designed). Anyway, we finished testing everything and put all the changes into the our final revision (we hope). We also had to incorporate a bunch of manufacturing changes to the PCB design to make it easier to produce so that yield would not be compromised. That said, we feel confident that we should be able to go to production after we get these next prototypes back. The files have been sent to our CM so we hopefully will get them back in 2.5 weeks. Testing should go pretty quickly when we get them back as we have everything setup to verify them.
Impedance Scare
We used the EMIF06-1005M12 from ST to protect the SD card signal lines in our design. However, it has an internal 100-ohm series resistor inside that is different from the 50-ohm impedance of the signal traces on the PCB board. This miss-match shouldn't matter too much normally... and in fact many of the PCBs we built have working SDIO buses that run at 50 MHz even with this issue.
But - not all. We discovered that the SD card did not work reliably on the last rev of our boards even though nothing in the circuit had changed. It turns out we were at the edge of reliability. We are glad to have caught this now versus later. This issue can be fixed in software by increasing the drive strength of the clock and changing pull-ups/downs - but, this is not optimal as different settings may be required for different boards.
Enter the EMIF06-MSD02N16, which is a more integrated circuit for SD card interfacing. It includes the necessary pull-ups, transient voltage suppressors, and 50-ohm series resistors. By using it we are able to keep the signal lines at 50-ohms impedance throughout.
My Friend Brandon
Two weeks ago, Brandon Gilles, the founder of Luxonis and creator of the OpenCV AI Kit (OAK) passed away. He was suffering from Long - COVID which destroyed his health last year. This news hits especially hard as I was planning on visiting him next week for a week. I was literally just texting him... He was recovering from the illness, able to walk again, and generally super-pumped about life before his lungs gave out.
Brandon Gilles was a talented, passionate, and devoted engineer who dedicated his life to using technology and innovation to improve people's lives. As the founder of Luxonis, his initial dream was to design an AI-powered product that would help bike enthusiasts avoid accidents on the road. He wanted to combine depth vision and neural network inference on a small embedded platform, enabling his device to perceive and understand the world like a human in real time. He then built a high-performance depth + AI inference product, OAK-D, using MyriadX chips, and made its software and hardware open-source, creating a community of development enthusiasts and making significant contributions to computer vision. Currently, Luxonis, under his leadership, produces a series of products centered around OAK-D, which have been widely adopted not only in cycling but also in many other fields, including industrial, agricultural, healthcare, security systems, and robot autonomous navigation. His dream has truly changed the lives of many people. However, in 2022, his health dramatically started to decline. He was diagnosed with Long - COVID / Myalgic Encephalomyelitis. He ultimately passed away in July 2023. During his struggle with the disease, he used his exceptional research spirit and learning talent to research and find treatment methods for himself and others. He selflessly shared hundreds of pages of treatment methods with all long-term COVID-19 patients. His family is currently facing unprecedented difficulties. Brandon Gilles was a very caring and dedicated person who used his technology and innovation to change many people's lives. Now we have the opportunity to repay his contributions and send them warmth and love. As a close friend and partner of Brandon Gilles, I would like to launch an every penny counts charity donation campaign to help him and his family through this difficult time. We believe that every donation will bring hope and change to them. Let us work together to make a difference in their lives. Should they eventually not need these funds, Briana (Brandon's Wife) would like to roll them into a charity or foundation of some kind, in his honor, to help others facing such tragic illness. The recipients of the donation will be Brandon's wife, Briana, their four-year-old son, and their two-year-old daughter. If interested please make your donation to either of the following accounts: Account 1 WISE Please click this WISE link to go on: https://lnkd.in/eA-VcUNh WISE: Account Holder: Briana Gilles Account Number: 822000730870 Wire routing number: 026073150 Bank code (SWIFT/BIC): CMFGUS33 Address: Wise US Inc 30 W. 26th Street, Sixth Floor New York 10010 United States
Account 2 Venmo Account @Briana-Gilles
]]>
https://openmv.io/blogs/news/openmv-ide-4-0-1-released2023-07-29T13:45:59-07:002023-12-12T16:40:43-08:00OpenMV IDE 4.0.1 Released!Kwabena Agyeman
Hi Folks!
Sorry for the delay in updates. I was in my lab quite a bit this week finishing up testing of the OpenMV Cam RT1060. Before talking about that though, big news! OpenMV IDE 4.0.1 has been released!
OpenMV IDE 4.0.1
Alright! We are finally in the present with the IDE and out of the past. With the launch of OpenMV IDE 4.0.1 we are now on Qt 6.5.1 with Qt Creator 10.0.1 as the base of OpenMV IDE. This means SSL support works again along with HighDPI scaling!
I fixed a tremendous amount of bugs in the new IDE release and also spent a lot of time polishing things. For example, the scrolls bars in the IDE for Windows/Linux are not native. I had to design those and the arrow icons for Windows/Linux in regular and high DPI mode. I put the effort in for this though because it looks way better than the default - seriously. There are numerous fixes like this throughout the IDE that should make it feel really well put-together.
Anyway, here's a short list of some of the improvements:
Updated to Qt 6.5.1
Updated to Qt Creator 10.0.1
Added support for High DPI Mode
Added support for Light Mode (and Dark Mode)
Fixed bugs with Video Tools
Added Binary File Editor Plugin
Added Diff Editor Plugin
Improved Syntax Highlighting
Improved Python Typing Experience (indentation on enter works now)
Fixed Edge Impulse Support (and other issues related to broken SSL support)
Fixed Sending Scripts using Open Terminal - now works for all scripts
Improved STM32 bootloader repair (lots of folks were having issues here)
Improved IMXRT firmware loading process
Translated into 34 languages
Improved installer experience on Linux
Fixed RaspberryPi Support (support for RPI works again!)
Fixed issues with Linux discovering serial ports
Updated command line arguments to allow automation for factory programming
Continuous Integration
The best improvement though for the new IDE as mentioned previously is that it's now built in the cloud for Windows/Linux/Mac/RaspberryPi using GitHub actions. Additionally, we have GitHub actions setup to also digitally sign the IDE on Windows and Mac entirely in the cloud. This means I can now build development releases of the IDE by just pushing a commit. So, if you have a bug it's now easy for me to create a new release of the IDE for you with the fix. Previously, it took my entire Sunday to release the IDE for multiple platforms - now it's just 20 minutes!
About version numbers in the IDE
Moving on, even releases will be dev releases and odd releases will be actual production releases. I have to do this to prevent issues with folks installing the development release and then having an official release with the same version number.
What features are coming next?
Thanks to Qt Creator 10 will we be able to enable full python parsing in our next major IDE release. This will give you the same level of IntelliSense support like in VS Code and other Python Editors. This will make your development experience much better!
OpenMV Cam RT1060 Prototypes
Alright! Now for our production status update.
We are happy to announce that the OpenMV Cam RT1060 Rev 2 prototypes work! There are some minor issues which I will get into next. But, we feel confident moving forwards and going into production next month.
About the Prototypes
First, we got our protypes back last week... after a bunch of delays... and to our dismay... they were quite different than our released design. We authorized our CM to make minor changes to the PCB to improve the ease of production of the PCB. Like nudging some components and etc. However, this got lost in communication and they completely redid the PCB layout!
However, the designer who redid the PCB was experienced, and they used the same schematic. So, we were able to get testing done. And... basically all features work. That said, of-course, our CM rushed to fix this issue over the week and we have our original design set to ship next week which we will re-verify again before we can approve the production order.
Low Power Success
Moving on, we were able to hit the low-power numbers we wanted to hit for the OpenMV Cam RT! The OpenMV Cam RT when in deep sleep mode draws about 30-35uA depending on the voltage you are powering it at! This is incredible! This is over 3 years of sleep runtime on a 1 Ahr battery! The current draw is so low that in sleep mode you can actually unplug power and swap batteries and the board will survive for a few seconds on just it's own internal bulk capacitance.
Fixes to make for Production
We did find a few issues with the prototypes. Mainly just with low-power mode and the ideal diode onboard. Getting power rail issues right on the first shot is really tricky.
So, our ideal diode onboard has a great feature where it prevents backwards current flow from one supply into the other. Awesome! However, to implement this in silicon means that the ideal diode has to turn off briefly when switching between supplies. Just for a few microseconds... not a big deal. Except at larger current draws the voltage rail output of the ideal diode collapses. So much so, that it resets and soft-starts again which kills the output of the ideal diode for milliseconds - which causes a complete system crash.
Not great. However, we can fix this by adding significant bulk capacitance to the output of the ideal diode. Through testing I found that about 200uF on the output of the ideal diode and 200uF on the output of the battery charger is enough to prevent the system from crashing when switching back and forth between power rails when running full-bore. We were trying to avoid having expensive Tantalum caps on the board. But, we have to add them to deliver a quality product.
Please note that above 200mA of current draw this solution does not continue to work. So, if you want to pull 1A from the 3.3V rail on your OpenMV Cam (which is possible) you will need to add a battery to your design which the battery charger can use to source power like a giant bulk capacitor when switching between power rails.
Second, for low power. We used a 100K pull-up on the PMIC control line which is pulled low to turn off the main voltage regulator. When pulled low this is 30uA of current draw on the system. So, we will swap out this 100K ohm resistor for 1M ohm to get down to the 30uA total system draw shown above. We also found a resistor pull-up to VCC on the RST line becomes a pull-down to ground in low-power mode that needs to be removed which was adding another 30uA current draw.
What's Next
Okay, so, once we actually get back the correct board design from our CM next week we will apply the fixes above and then go through testing again to verify everything works. So, we should be able to approve mass-production in about two weeks and hopefully start shipping near the end of September!
Prototype Sales
Finally, we will be shipping prototype pre-orders to customers now. That said, since we're getting double the number of PCBs expected I'm opening up the sale of more of the OpenMV Cam RT1060 prototypes. We will be shipping our current set of orders of these units next week and any more new orders the week afterwards.
Prototypes will receive software updates and will work with our firmware correctly. However, they will not be able to switch between VIN/USB dynamically when the main MCU is streaming video data and in low-power mode will only go down to 200uA. Other than that they should work great!
And finally, to end this blog post. At the time of writing we have 9966 people on the email list!!!
Wow!
Not looking forward to hitting the next tier of Mailchimp bills though!
Anyway, that's all folks!
]]>
https://openmv.io/blogs/news/nxp-partnership2023-07-06T16:44:36-07:002023-12-11T18:15:23-08:00NXP PartnershipKwabena Agyeman
Hi Everyone!
I've got a bunch of great news this week. Let's get into it!
Prototype Status Update
Our PCB fixes were accepted by our CM last week and they are now building 20 production sample units. We expect to get the samples back in hand in 2 weeks. Once I get the samples I'll verify all the features, and if things work, approve the mass production of 2500 units. We will also ship the sample units to folks who ordered one.
So, we're just playing the waiting game right now.
NXP Partnership
I went to NXP Connects last month and got a warm welcome from NXP! NXP is super excited about the OpenMV Cam RT1060 and they are partnering with us in a real and concrete way to ensure that we have access to chips to build the OpenMV Cam RT1060.
Given this, we don't expect to run out of chip stock necessary to build the OpenMV Cam RT1060 ever again thanks to NXP's support. Additionally, thanks to NXP's support we're getting better pricing access for to the MIMXRT106 chip that powers the OpenMV Cam RT1060. So, in the future we expect to be able to offer the camera at a lower price as production ramps up.
OpenMV IDE 4.0.0 is coming around the corner. We are now code complete with all the updates and new features. I'm now working on getting the release process operational for Windows/Linux/Mac/RaspberryPi. So, far, the Windows and Linux installers are building. So, it's just Mac and RaspberryPi left to go.
One of the best features for the new IDE will be that we are moving to GitHub actions to build the IDE in the cloud. This will allow us to ship updates faster and more frequently as we add features and fix bugs.
Anyway, the focus right now is on just getting this done. I've been at work all month doing the update from Qt5 to Qt6 and rebasing things on QtCreator10 from QtCreator4.
Firmware Status
Ibrahim finished pushing the initial commits for the OpenMV Cam RT1060 to Github last week. There's still quite a way to go to enable all the hardware acceleration features the OpenMV Cam H7 and H7 Plus have. But, once I'm done with the IDE I'll be able to switch over to helping with the firmware to make this happen sooner.
And Last But Not Least
I am going full-time on OpenMV!
Since the start of OpenMV I have always been running the company and working on the project in my free-time. When I was an individual contributor at my day-job this was more or less possible as long as I spent most of my nights and weekends on OpenMV. However, when I started managing Embark Truck's Electrical Engineering Team I really didn't have time for OpenMV anymore as my day-job became much more demanding and required my nights and weekends too in-order to push our technology forward.
I've had an amazing time working at Embark Trucks for almost five years. I got to see it grow from ~30 employees when I joined to over ~300. See it go public on the NASDAQ. Enjoy multiple six hour long rides as an operator watching the system drive itself in back-to-back trips between LA and AZ. And, I got to play with high end sensors and systems there and learn what is useful for building real things that will go out into the world.
So! I hope to bring lessons learned from working at Embark to making the OpenMV Cam into an awesome and extremely useful product for everyone.
It's an auspicious time for OpenMV. The chip shortage is more or less over allowing us to build cameras again. And new microcontrollers are set to hit the market powered by ARM's Cortex M55 CPU (and M85 in the future) along with the Ethos U55 NPU. Ibrahim and me are excited for where things go from here!
(I started pushing hard on OpenMV again four months ago when Embark Trucks shutdown. But, I'm announcing this now as last week was my final week at Embark after helping Embark to merge with Applied Intuition).
]]>
https://openmv.io/blogs/news/ide-update-news2023-06-21T12:03:16-07:002023-12-11T15:49:47-08:00IDE Update NewsKwabena Agyeman
Hi everyone!
IDE Update Progress
So, I don't have a lot of news this week. However, the IDE update is going smoothy. We've implemented support for normal and high-dpi mode in the IDE and support for light/dark mode in the IDE. Here's how things will look!
Syntax highlighting has been greatly improved and is now quite a bit smarter. In general, you should notice a much higher level of polish in the new IDE. I've really focused on making everything look pixel perfect.
Light mode is a new feature which makes the IDE easier to look at when you are outside on a laptop screen. We've had some users asking for this feature for a while now and we are happy to have this coming out soon.
Other Stuff
And of-course... the IDE update comes with bug fixes for a wide range of issues. SSL support has been fixed, disappearing menus, etc.
Production Prototypes Update
We're a bit delayed on the production prototypes. Our contract manufacturer recommended we change the via sizes on the PCB from 4 mil to 8 mil and update wire spacing from 3 mil to 4 mil to improve yield and reduce PCB cost. These weren't an issue for MacroFab. But, when building 2500 PCBs versus 20 these things matter. Anyway, we hope to be able to stay on schedule as it should take less time to manufacture more simple PCBs than if we had moved forward with the more complex design.
And... that's all folks!
]]>
https://openmv.io/blogs/news/openmv-cam-rt-rev-2-ready-for-sample-production2023-06-06T12:09:42-07:002023-12-11T15:48:51-08:00OpenMV Cam RT Rev 2 Ready for Sample ProductionKwabena Agyeman
Hi Folks!
OpenMV Cam RT Rev 2
We've finished the design of the second revision of the OpenMV Cam RT1062 Rev 2. We'll be sending it off to sample production this week to our contract manufacturer who will build samples using the full production process before we green light the rest of the production run.
As mentioned previously in the last blog post, we have made the following changes to the design:
Battery charging now works on both USB and VIN so an attached battery charges no matter what.
We increased the current limit for the whole system so that it can draw up to 1.5A from either USB or VIN.
We switched out a few components on the board to reduce the chance of fabrication issues (and/or component reversals).
The low power mode regulator has been reduced to 1uA of current draw from 25uA.
There's support now to attach an external 3V 210mA or so coin cell battery with wire leads so you can keep your OpenMV Cam's RTC running even without a main external battery. This will give you about 4 months of low-power mode keep-alive if the main external battery is removed.
Status signals for if you are running on battery or USB/VIN are now available to the MCU.
There's a user button now on the camera for triggering whatever you like in code.
There's also a new power button so you can shutdown the camera and enter low-power mode on demand.
We updated the crypto chip onboard to the NXP SE050 which is already supported in Mbed TLS in MicroPython. This means, you'll have working SSL using a unhackable private key on your OpenMV Cam RT out of the box (the security chip doesn't allow you to read the private key out of it - so, it's impossible to clone the system).
Both headers are 2x8 now which future proofs the design for more GPIO pins and breaks out a Serial Bootloader recovery pin which lets you unbrick your board without needing a SWD debugger in the event you corrupt the onboard second stage bootloader in flash.
And for bug fixes... we improved the bluetooth circuit by adding the RTS/CTS pins and a low-power crystal necessary for the system to work.
There were some mosfet level shifters with the wrong gate voltage causing them to leak and ruin our low-power mode current draw numbers. We expect to be sub 50uA on Rev 2.
We fixed the LED resistors so they aren't so bright and also added pull-ups to keep the LEDs from turning on accidentally because of pull-downs inside of the processor.
Finally, there's just one 16MB flash chipboard now. 4-8MB of that will be reserved for the firmware and 8 MB for user storage. We've verified you can execute in-place from it while also reading/writing to the user storage drive.
Anyway, thanks to all these changes you should have a really good experience with your OpenMV Cam now for turning it into a more mobile system! A real power button means yo can enter/exit low-power mode easily while a user button lets you take pictures on demand without needing anything else. Note that there's also a pin header that exposes the power button signal too so this can be controlled via an external system if you want.
Finally, for the folks who ordered sample units we will be shipping you the Rev2 boards once we have them. Timeline-wise we expect to get Rev2 units back about one month from now in July. We already have all the tests setup to verify the boards so we should be quickly able to get to greenlighting the full production run in the middle of July if things continue to go smoothly.
That said, while we expect to sell out of this production run pretty quick please note that we will be gearing up for another right after this one.
IDE Update News
Bugs have been piling up with OpenMV IDE for the longest. However, we're finally updating it to the latest version of Qt 6.5 on top of QtCreator 10.0.1!
Thanks to the new Qt support all the High-DPI bugs have been resolved. This also includes issues like menus disappearing and other random problems that existed with the Qt 5 libraries. Additionally, Qt 6.5 uses the latest OpenSSL library which should resolve SSL support issues.
Anyway, once the IDE update is complete we should be able to close about half of the outstanding issues with the IDE along with it looking amazing again!
That's all folks! We're just grinding away on things right now. Not else much to talk about.
]]>
https://openmv.io/blogs/news/prototype-testing-results2023-05-21T20:25:20-07:002023-12-11T14:17:27-08:00Prototype Testing ResultsKwabena Agyeman
Hi Everyone!
Great news! Our OpenMV Cam RT Prototypes work and we've been able to verify most of the circuits for the new system. We'll be doing one more sample production run of a small number of units with our contract manufacturer now to verify we've got everything right before we start our mass production run. These new sample units will also incorporate a bunch of low-risk changes.
Anyway! Please checkout the video below of the OpenMV Cam RT operating!
Here are some highlights of what's working that we've tested so far:
The USB-C connector is working great and USB is running at 480 Mb/s!
Battery Charging is operational! It will charge an attached battery at 100mA/s automatically while your OpenMV Cam RT has power and then keep your OpenMV Cam RT running when power is removed!
The Ideal Diode Circuit on the board allows you to power the camera from VIN/USB at the same time and it will automatically choose the source with the highest voltage. Best of all, it has no voltage drop power loss.
SDRAM is operational at 166MHz @ 16-bits.
QSPI Flash is operational at 133MHz @ 4-bits.
SD Card is operational.
The Camera Bus is operational at 80 MHz @ 8-bits.
SWD is operational for debugging! Note that the OpenMV Cam RT is our first OpenMV Cam where you can debug it using professional tools - like with a SEGGER J-Link!
Ethernet is operational at 100Mb/s with the new PoE Shield (which also provides power successfully)!
WiFi and Bluetooth* are operational.
And finally! For low power mode, we've confirmed that we are able to achieve 125uA of current draw when completely shutdown. While this is more than what we thought, we should be able to lower this drastically on Rev 2 of the design.
Rev 2 Improvements
Now, for behind the scenes. What are we improving?
When I designed the battery charger circuit it only chargers from USB. This was an oversight, so, we're changing around the system so you can charge an attached battery from VIN or USB.
In addition to this we are raising the amount of current your OpenMV Cam is allowed to draw from USB/VIN to 1.5A so you can use our new PIR Shield which has high power white/infrared LEDs without risk of browning out.
We used two 1mm by 1mm components on the board. While they are small and can save space... they also can be put on backwards. So, we're going to be swapping them out for larger devices since we have board space.
Battery Status (and even charging status along with VIN/USB power source status) will be available to the processor so you can adjust your behavior when running on a battery.
Regarding the low power issues, we're moving to a new 3.3V regulator for the low-power domain that draws 1uA versus 29uA. We also identified an issue with three level shifter circuits on the boards that were causing a massive amount of leakage current. So, with these changes we hope to get the low-power mode current draw to ~25uA from 125uA.
The LED we are using is EXTREMELY energy efficient. It's bright with only 330uA of power. On our prototypes we are giving the LEDs 15mA of power which makes them blinding!
A Button on the camera so you can finally easily trigger it to do something.
And finally, we are making both headers 2x8 so that we can future proof the board design along with breaking out an I/O pin for you to be able to recover the board if it's bricked (like the BOOT0 pin on the OpenMV Cam H7).
And of-course. There are many more changes. However, these are all small. The biggest lesson we discovered with the RT1060 was the need for a DQS pin on the SDRAM and QSPI Flash.
Basically, in-order to read data from SDRAM/FLASH at high speeds the processor has to route a read-strobe from inside the chip, to outside the chip, to back inside the chip in-order to simulate a delay such that the read of data on the data bus happens in the middle of the bit period. Most processors... do this internally without requiring you to waste an I/O pin (two in this case) by reading the data on the negative clock edge. However, the RT1060 is unique in this way.
Because of this requirement the second QSPI Flash on our prototypes is not functional. The DQS pin necessary to get the first QSPI Flash operating at high speed is located on the CS pin of the second flash. For SDRAM the DQS pin overlapped with the FSIN pin on the camera which we were able disconnect to get the SDRAM operating.
Finally, the last serious issue was that bluetooth was not given RTS/CTS pins for it's UART which make high baud rates impossible. However, conveniently, on removing the second QSPI Flash we were able to free up the necessary I/O pins for fixing bluetooth support, the new empty DQS pins, the FSIN pin having to be moved, support for status from the battery charger system, and the new user button!
Regarding how we are handling removing the second QSPI Flash. Well, it turns out it is not needed. We had added it so that the main program could execute in place from the first QSPI Flash and allow the second to be writable without disturbing the main program. However, it turns out that we can actually store the firmware and embedded disk drive on one flash chip without any issues.
For Folks Who Ordered the Sample Units
Given the above breaking changes that we need to do for Rev 2 we're just going to increase the number of samples we make with our contract manufacturer of the Rev 2 design and we will provide those to the few folks who wanted to test out samples. While the Rev 1 units do work it will not be possible for us to support them firmware wise.
As for a timeline on the Rev 2 board design. We hope to send it out by the beginning of next month and get it back in the beginning of July. Assuming everything works and we've got all the bugs out we'll start production and hopefully start shipping at the end of August and/or beginning of September.
In the mean-time you can pre-order the OpenMV Cam RT now! More than half of the production run has already sold out. The specs on the product page have been updated per what we expect for R2.
That's all folks!
]]>
https://openmv.io/blogs/news/better-camera-modules2023-05-08T22:26:39-07:002024-03-26T22:46:06-07:00Better Camera ModulesKwabena Agyeman
Hi Folks!
We've got a lot of content for you in this update. Let's get to it!
First, from around the web! Something awesome! Please congratulate Team Roboticus for winning the Notional Dutch Championship in Robotic Soccer using an OpenMV Cam to power their robot! They are now going to the world championship in Bordeaux and the European Championship in Croatia.
Hopefully, board bringup goes well and we are able to greenlight the production run in June to build 2K initial units and make the OpenMV Cam RT a reality.
In the mean-time we've figured out the final price of the OpenMV Cam RT and you can pre-order it now!
Please note that we will be converting all OpenMV Cam H7 Plus pre-orders over as credit to the OpenMV Cam RT.
Better Camera Modules
Moving on, along with launching the OpenMV Cam RT with new and improved shields we're also updating our camera module lineup! Folks have been asking for better stuff for a while. So, we're going to offer support for many great sensors from OnSemi!
HDR Camera Support
HDR cameras are extremely useful for doing computer vision outside. Generally, whenever the sun pops into view it's going to destroy your image quality and cause parts of your image to blow out. HDR camera sensors seamlessly handle these situations for you:
So, we're going to expand our camera lineup to support HDR imaging potentially using the AR0231, AR0147, or AR0132. All support >120 dB of dynamic range at over 30 FPS at full resolution compared to the OV5640 which has just 70 dB of dynamic range.
This means these cameras can see a car in front of the sun while you are coming out of a tunnel. Something tough even for our eyes to handle.
Cost is pretty high on the modules so we'll try to have a 1MP option that's slightly more affordable and a high-end 2MP option. Note that the cameras pair with an OnSemi ISP board that stacks below the camera module before connecting to the OpenMV Cam (which will be included with the camera).
Color Global Shutter Camera Support
We've had the MT9V034 Global Shutter camera sensor on sale for a while and folks have loved it. So, it's time to support the new AR0234, AR0144, and AR0135 line of global shutter cameras from OnSemi.
Like with the HDR cameras we'll support a more affordable 1MP option along with a high end 2MP option for folks. The cameras will also pair with a stackable ISP board from OnSemi so we'll be able to support crystal clear color images by default.
So, what's the cost going to be for these amazing camera modules? Unfortunately, not cheap, but, worth it. We want to make it easier for you all to build real applications with your OpenMV Cam's and this starts with us providing sensors that can work in challenging environments - like being able to see outside from indoors! (Try it with your phone on a sunny day from a dark room and be disappointed).
Triggering and Strobe Support
And finally! Best of all, these new camera modules will all support triggering and strobe support. This means you can trigger these cameras either from your OpenMV Cam RT directly or from an external source via P10 on your OpenMV Cam. By default all the shields mentioned in the previous blog post have a sync input line that goes directly to the camera trigger to allow you to hookup your OpenMV Cam to a 0-36V trigger input to let your camera know when to capture a picture.
But! Even better, we've routed the strobe output from the camera modules back to an I/O pin on your OpenMV Cam (the MISO pin on the SPI bus in our camera modules) which will allow you to receive an interrupt EXACTLY when the camera module starts it's exposure. This will allow you to turn on LED's and etc. to help image capture only when needed. Additionally, you'll know exactly when the camera module started to take an image so you can timestamp things appropriately.
A note on Low-Power
Keeping with our working low-power theme when you toggle PWDN now this turns off the regulators on the camera module and ISP board which will result in no current draw when you need to put things into low power mode.
OpenMV IDE 3.0.3 Release
Finally, I'll end out the update with mentioning that OpenMV IDE 3.0.3 is now available! The new IDE has a bunch of general bug fixes and some new features to make people's lives easier like Auto-Reconnect which allows the IDE to automatically connect to an OpenMV Cam without stopping the main script.
Moving on, this is the last version of the IDE which will have 32-bit Operating System support. I will be working on updating the Qt Libraries and QtCreator which we use as our IDE base. We've had a lot of issues that have been piling up over the years as the IDE software has grown out of date that we are finally going to fix. However, 32-bit support was dropped a long time ago by Qt. So, once we finish with the update we will no longer be able to offer it. Hopefully, this isn't a problem for anyone.
Anyway, that's all folks!
]]>
https://openmv.io/blogs/news/better-shields2023-04-23T18:11:49-07:002023-12-11T15:47:39-08:00Better ShieldsKwabena Agyeman
Hi Everyone!
I wasn't lying about a two week cadence for updates! Mailchimp is charging us a fortune to maintain the mailing list. So, we're going to use it!
Better Shields
For the OpenMV Cam RT launch we're upping our game when it comes to shields. For too long they have been basic low functionality addons. Moving forward we want you to actually be able to build real applications using our technology - not just make demos.
We've got six shields to talk about today. So, without further adieu I'd like to introduce the...
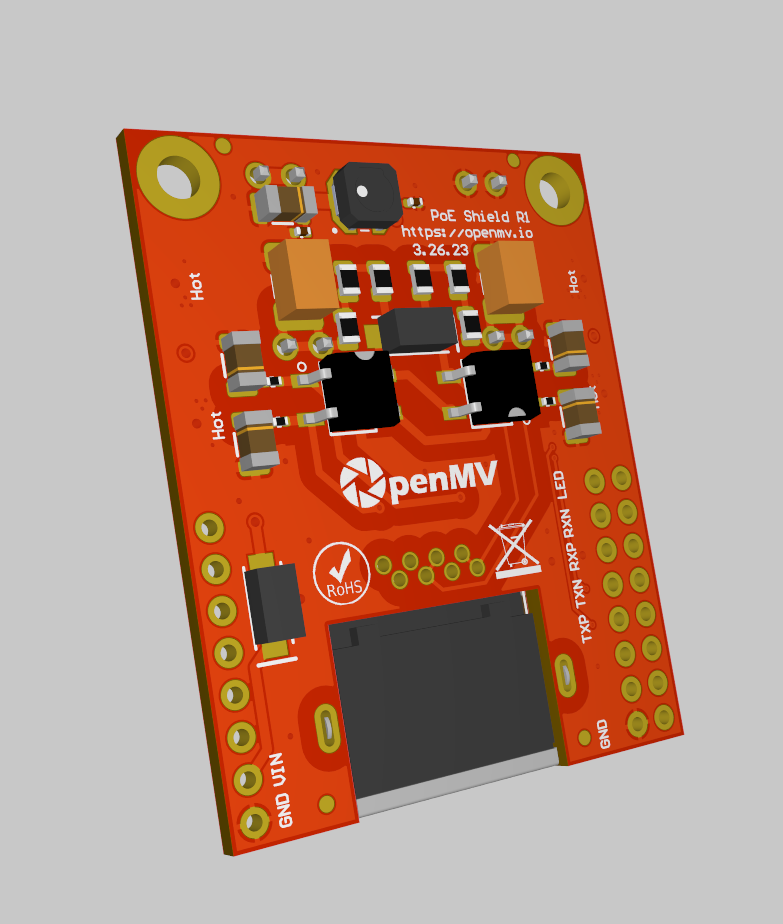
PoE Shield
The PoE shield is designed to fit on the back of your OpenMV Cam RT and gives you a 10/100 Mb/s IEEE 802.3af PoE complaint Ethernet Interface capable of providing your OpenMV Cam with 7W of power (however, note that the camera internally will never use more than 2.5W). We're leveraging the AG9905LP ultra-miniature PoE module to give you this functionality. The PoE Shield accepts power from PoE Mode A or B configurations ensuring that it should work with pretty much any PoE power supply. Finally, we integrated all the required filters to deal with EMI and have robust Transient Voltage Suppression (TVS) onboard. You can find the schematic for the shield here.
Note that PoE shield requires a minimum load of 1W - otherwise the AG9905LP module makes a whining noise. So, in order to meet this at all times the shield has four 100ohm resistors to ground in parallel - hence the hot labels on the shield.
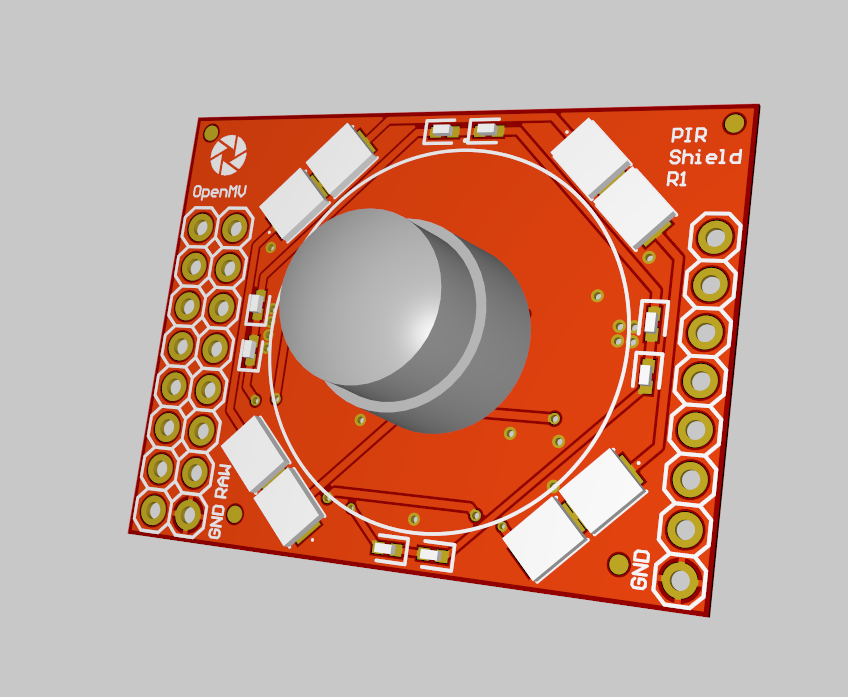
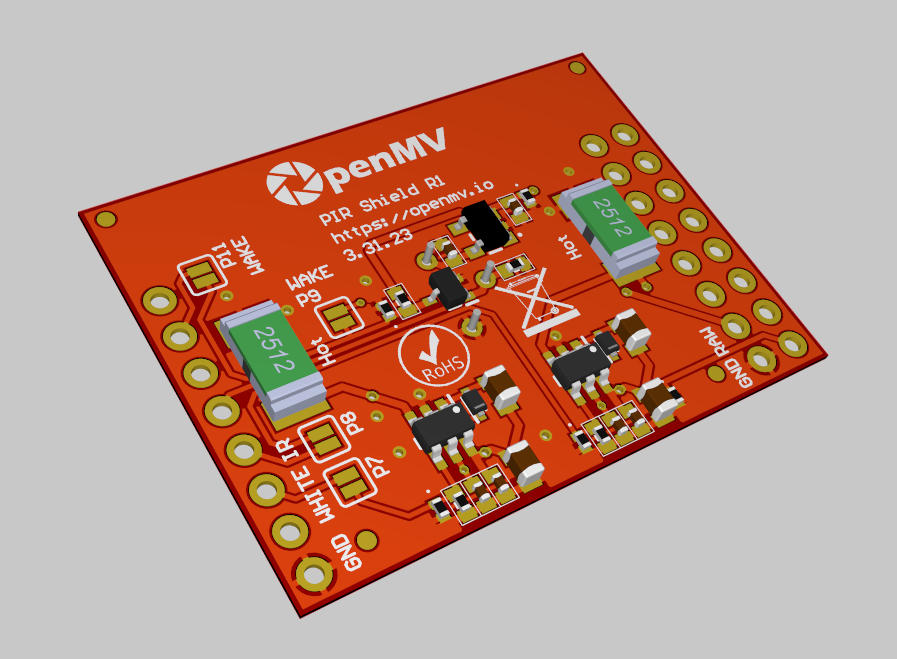
PIR Shield
With the OpenMV Cam RT you're going to be able to fully shutdown the device to reduce power consumption to less than 50uA. After you do this you need an interrupt to wake you up. What better way than with a PIR motion detector!
The PIR shield supports the EKMB line of PIR Sensors from Panasonic Electric Works which draw 6uA! It comes with their smallest, low-profile, unit by default, which has a 5 meter range and 110° field-of-view. Additionally, the shield can be customized to use the many other larger range and field-of-view modules available.
But, what's motion detection without illumination? That's why we added eight high power white and IR (850nm) LEDs on the PIR shield. Both LED chains can be controlled via PWM independently. Finally, to make stacking shields more flexible all I/Os are connected to the pin headers via solder bridges (some of them are connected by default which is not shown in the render). So, you can disconnect features on the shield to make your shield stack work for your application. You can find the PIR Shield schematic here.
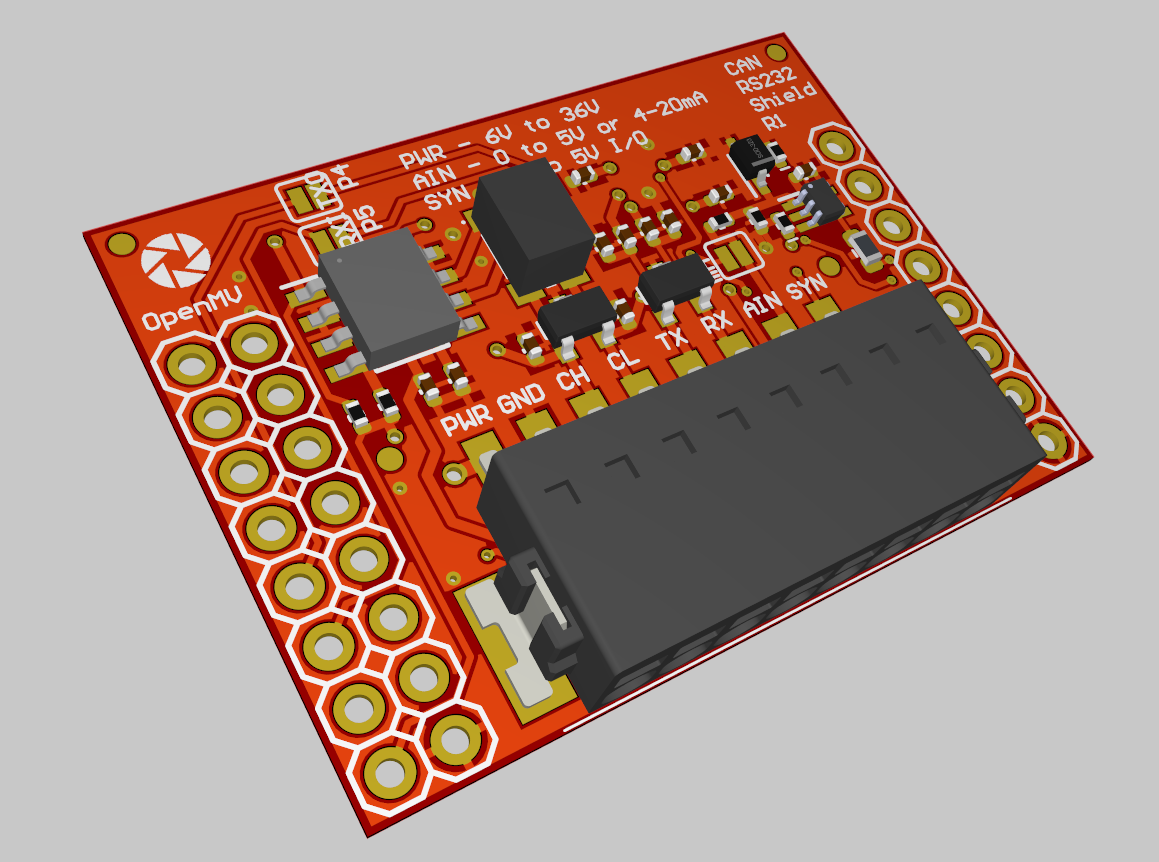
CAN & RS232 Shield
Now for more connectivity! I'd like to introduce the CAN & RS232 shield. It features a 8 Mb/s CAN-FD Capable PHY, with selectable termination resistors, and a 1 Mb/s RS232 Capable PHY. With the CAN & RS232 Shield you should have no problem interfacing your OpenMV Cam with other Microcontrollers on a robot or in an industrial system. You can find the CAN & RS232 Shield schematic here.
However, best of all... it features a wide input range voltage supply!
(Yes, I noticed the labels are messed up on the shield above. That will be fixed).
What's a Wide Input Range Voltage Supply?
Glad you asked! This means you can give the CAN & RS232 Shield an input voltage between 6-36V. Want to power your OpenMV Cam with a 7.4V LiPo Battery? No problem. 12V Battery from your Car? Go ahead. 24V from an industrial bus? Do it!
Also, we've got reverse voltage protection on the input along with heavy TVS protection. Feel free to plug your camera into a really long power cable.
But there's more!
The CAN & RS232 Shield also features a 0-5V analog input with reverse and over-voltage protection which buffers and scales that 0-5V input to a 0-3.3V for your OpenMV Cam. The analog input also features a selectable load resistor so that you can interface with 4-20mA current sensors.
And finally, there's a flexible trigger I/O. By default it acts as a 0-5V input with reverse and over-voltage protection that you can use to sync your OpenMV Cam to an external trigger. However, you can optionally change this input to a 0-5V output that has short-circuit protection.
What's that terminal block header?
We're not going to have terrible terminal blocks on OpenMV Cam shields anymore. It's time for high quality (but, not high-cost) headers. So, we're putting Phoenix Contact Push-In connectors for our shields. These type of headers hold onto wires inserted into them via a spring latch. So, they don't chew into wires like screw based terminal blocks and don't loosen up during vibration and shock. This means you can be confident your wires will stay in the header on your robot using your OpenMV Cam no matter the action it sees.
(You get the wires in and out using a flat head screw driver that you stick in the top rectangle area of the terminal block which releases the spring temporarily).
RS422-485 Shield
The RS422-485 Shield is for professional OpenMV Cam users deploying the system to industrial applications. It's powered by the THVD1426 RS485 transceiver which is able to automatically determine the bus direction without need for a data enable signal (which the OpenMV Cam RT's UART does not provide on our pin header). The THVD1426 is capable of 12 Mb/s. So, you shouldn't have any problem integrating your OpenMV Cam into a MODBUS application or even a DMX-512 Universe. There are two THVD1426s onboard which allow the shield to seamlessly work in RS422 and RS485 applications (but, not at the same time). The schematic for the RS422-485 Shield is here.
Like the CAN & RS232 Shield previously the RS422-485 Shield features and same wide input range voltage supply, analog input, and trigger input/output.
Driver Shield
The Driver Shield is a new version of our Motor Shield with much better features. It has the same wide input range voltage supply, analog input, and frame sync input/output pin as previous boards. And... two DRV8876RGTR 3A current limited motor driver's onboard which can handle the 6-36V input voltage range! This means the driver shield can easily handle your 12V robot motors, or that 24V solenoid. Best of all, the driver shield uses different I/O pins on your OpenMV Cam than the PoE Shield, CAN & RS232 Shield, and RS422-485 Shield so that you can use it as the same time as those other shields. You can find the Driver Shield Schematic here.
Even cooler, the DRV8876's can operate in different modes:
By default the DRV8876's onboard operate with a DIR/PWM interface where you use your I/O pins to control the direction and speed independently of two attached motors.
However, you can also put the DRV8876's into a mode where you have a full H-Bridge Interface where you directly control each side of the H-Bridge. This allows for more advanced motor control.
Finally, if you just want a high power I/O driver you can operate the DRV8876's in Independent Half-Bridge mode where each driver gives you two 3A push-pull outputs.
Finally, since each driver is independent you can mix and match the above.
Relay Shield
More shields! Yes, I was busy getting some ideas out of my head.
So, the Relay Shield has the same standard features as the other shields. It's not a particularly complex shield. It just gives you two independent Normally Closed or Normally Open relay outputs that can handle up to 60W of power. This means you can use it to control 2.5A loads at 24V DC or 0.5A loads at 120V AC - your choice. You can find the schematic here.
Why make the Relay Shield? Well, while the Driver Shield can generally drive everything you need and the relay shield can cover the rest. My original idea was to have MUCH more heavy duty relays onboard. However, I wanted the shield to be stackable. So, we're using the biggest relays on the market that fit.
You may have noticed that our shields are designed with features in mind to meet the needs of industrial customers. This is because the OpenMV Cam has started to appear a lot more in factories. So, we're trying to make that integration easier. Additionally, industrial features are just... nice. Having a robust power supply that can handle some abuse means you don't have to worry about your OpenMV Cam breaking easily. The chips and components required for this are inexpensive and small.
However, Galvanic Isolation is a different beast. Components are expensive and physically very large. For example, IEEE 802.3af requires the PoE shield to have galvanic isolation which makes the shield huge (and more expensive).
So, as a tradeoff, our current shield lineup brings features from the industrial world to the OpenMV Cam except for Galvanic Isolation unless required.
Cool, when will these be available?
We've ordered prototypes of the six shields above from MacroFab. We'll get and test them after getting the OpenMV Cam RT. However, we'll focus on mass production of the new shields after launching the OpenMV Cam RT successfully.
Other Stuff
The Cortex SIMD instructions are nice. It's possible to do automatic white balance onboard the camera using the CPU and SIMD instructions with no frame rate loss on a color version of the global shutter sensor at full-res:
Anyway, that's all folks. Thanks for reading!
]]>
https://openmv.io/blogs/news/introducing-the-openmv-cam-rt2023-04-09T20:44:28-07:002023-12-11T15:45:37-08:00Introducing the OpenMV Cam RTKwabena Agyeman
Hi Folks!
It's been a long time since we sent out our last email update and a lot has happened since then. However, that will change starting now. We're going to be getting back to a two-week cadence on email updates to keep everyone informed on what we're up to. Ibrahim and me are working harder than ever on OpenMV now. So, with that said, we'd like to introduce you to the latest OpenMV Cam!
The OpenMV Cam RT
But, before I get into the details, I'd like to share a little back-story.
When we launched the OpenMV Cam H7 Plus the OpenMV Cam became more popular than ever. We've consistently sold out of the OpenMV Cam H7 Plus and we've wanted now to build more units for years. However, it's been impossible for us to get the larger package STM32H7 chips that support external SDRAM. We've been waiting on an order of 5K STM32H743VIIK6 chips we placed back in April 2021 (2 years ago now) that have yet to be delivered.
So, as the chip shortage started to ease this year we were excited to get back to production again as our order for 5K chips was set to be delivered in March. However, one month before delivery we got news that it would be delayed again until December. Similarly, the STM32H743VIT6 that powers the OpenMV Cam H7 regular is tough to find on the market now too (i.e. the chips are going for the same price as the whole camera unit right now).
Given all this it was time for a redesign and a new direction. Note, we were actually were planning on launching a new higher speced H7 based camera called the H7 Pro using some of those 5K chips. We had the firmware ready to go along with everything else. But, without being able to get the STM32H743VIIK6 we can't build it.
Say Hello to My Little Friend
Alright, what is the OpenMV Cam RT? Well, it's an OpenMV Cam powered by NXP's IMXRT1060 - and it's an ABSOLUTELY packed board. We used every single I/O pin on the processor to give you the most features possible. Here are the performance specs:
Cortex-M7 @ 600 MHz w/ Double Precision FPU
32-KB Instruction Cache + 32-KB Data Cache
This is a 1.25X Faster Processor than the H7 Plus
1MB of SRAM on chip (acts as an L2 cache in our firmware)
All of this SRAM is linearly mapped so we can use it all as an L2 cache to speed up image processing at larger resolutions.
32MB of 16-bit SDRAM @ 160 MHz - 320 MB/s
This is the same amount of RAM on the H7 Plus - albeit with a slightly slower theoretical data rate. However, it may be faster in practice thanks to a better memory SDRAM controller on the IMX.
16MB of QUADSPI Flash for storage @ 160 MHz - 80 MB/s
This is the half the amount of storage flash on the H7 Plus. However, it's clocked way higher.
8MB of QUADSPI Flash for firmware @ 160 MHz - 80 MB/s
This is 4X the program space on the H7 Plus.
SD Card Slot @ 50 MHz - 25 MB/s
Same as the H7 Plus.
From our tests on the IMX RT dev boards so far it's definitely faster than the H7 Plus. We're excited to bring the system to you. But, there's way more! Peripherals are important and we packed a lot of great features on the OpenMV Cam RT.
USB High Speed Support (480 Mb/s)
Finally! You can stream images out of the OpenMV Cam at the rate they are coming in. Want to turn your OpenMV Cam into a webcam? Not going to be a problem anymore.
10/100 Mb/s Ethernet onboard
We'll be launching the OpenMV Cam RT along with a PoE Ethernet shield for it! Yes, you're going to be able to remotely deploy these cameras now. And... did you know OpenMV IDE has Ethernet/WiFi Debugging support?
WiFi (a/b/g/n) and BLE (v5.1) onboard (11/54/65 Mb/s)
No need to buy the WiFi shield anymore and use up all your I/O pins. This is going to be a standard feature moving forwards. We have a chip antenna onboard by default and an option to attach a U.FL antenna connector instead.
We want you to be able to build the OpenMV Cam RT into real products. That starts with being able to securely store your device private keys.
An accelerometer onboard
Coming soon: auto image rotation like your phone! We've actually want to bring this feature to our product for years and now we finally can. Yes, it would be nice to have a full 9-DoF IMU. However, the cost for IMU chips is still really high right now. Note, you'll have full access to the accelerometer to use it for anything you want.
JTAG Support via a standard ARM 10-pin connector
Now you can use a SEGGER J-LINK or etc. to debug your OpenMV Cam. This makes the OpenMV Cam RT like a dev board for you professionals out there.
USB Battery Charging
Thanks to the BQ24075 onboard we have dynamic-power-path-management support that allows the OpenMV Cam RT to charge an attached 3.7V LiPo at 100mA while keeping our USB power consumption below 500mA. If your application draws more than 400mA (unlikely) the battery charger will automatically reduce the battery charging current to keep the system total under 500mA.
And... like the OpenMV Cam H7 and OpenMV Cam H7 Plus you can run off the battery when USB is not present.
However, as an improvement we now have an ideal diode onboard to select between battery/USB power and VIN (which has priority). So, you can now support powering your OpenMV Cam via VIN, USB, and optionally have a battery all at the same time. No more conflicts!
Real Low Power Support
The OpenMV Cam RT is equipped with a 32 KHz RTC (which is inside the IMXRT) and supports a hardware power down mode. So, when you put your OpenMV Cam RT into deep sleep we actually turn off the main 3.3V regulator onboard. This allows the system to draw 50uA in it's lowest power mode! Then, you can wakeup via a new dedicated I/O pin or via an RTC alarm.
As you can see, the OpenMV RT is a big upgrade! We're excited to move forward with it! However, there's one more thing onboard I want to mention: EMI Suppression and Transient Voltage Suppression (TVS) support onboard!
With the OpenMV Cam RT and moving forwards we're serious about making our electronics better now. So, this means we added TVS Diodes to all the I/O pins so that you can't zap and destroy your OpenMV Cam RT via static shock anymore. Further more, we've got EMI filters now on all external interfaces to reduce radiated noise. These are small features, but, hopefully they will result in less randomly dead OpenMV Cams.
OpenMV Cam RT Product Launch
Thanks for reading this far! We just sent the OpenMV Cam RT off to sample production last week. We expect to get sample units back in May. Assuming they work and we finish board bring-up in May we will greenlight a 2K unit production run in June. All the parts to build the OpenMV Cam RT are in stock with distributors so we expect the production run to not take too long.
In the mean time, if you want to get your hands on one of the production samples you can! We're selling off 32 extra units here! If you are all at interested in this impulse buy now as these will go quick.
You can also find all the specs, schematic, datasheets, etc. on the link above.
What about OpenMV Cam H7 Plus Orders?
We're going to be converting OpenMV Cam H7 Plus orders into credit for the OpenMV Cam RT. Given it's unlikely we will receive the chips to build the H7 Plus this year we're just going to move everyone to the OpenMV Cam RT. Everything except the PYB module will be the same from a software standpoint.
What's the OpenMV Cam RT Pricing?
Our contract manufacturer is working on the cost of the production run right now and we'll have pricing information soon. We have an estimated cost right now. But, once we have the final price per unit we'll be able to determine what sales price should be. I don't expect it to be more than the OpenMV Cam H7 Plus with a WiFi Shield from our store right now.
Final Note
You may have noticed the nice 3D renders of the board! That's thanks to us using Altium now! We're in the process of bringing all our boards into Altium and generating 3D CAD for everything we sell. We want to empower everyone to more easily build the OpenMV Cam, it's shields, and accessories into things.
And... That's all folks! Thanks for reading! In the next update I'll talk about the new shields we have coming out for the OpenMV Cam RT!
]]>
https://openmv.io/blogs/news/production-update2021-06-27T21:59:28-07:002023-12-12T16:46:59-08:00Production UpdateKwabena Agyeman
Hi folks!
We've got some exciting news!
OpenMV Cam H7 Update
Okay, first for the OpenMV Cam H7 we completed a new sensor board for theMT9M114and a high performance software driver control it. The new sensor offers much improved image quality compared to the OV7725 along with a higher resolution. We've also changed the lens from 2.8mm to 2.1mm to keep the field of view the same as original OpenMV Cam H7. The sensor FPS hits about 80 in bright environments and 40 in dark rooms. Higher frame rates up to 120 FPS can be unlocked by setting the readout window (but, this crops the field-of-view).
It wasMUCHeasier to write the driver for this sensor compared to the OV5640 as we had access to extensive documentation from OnSemi along with a much improved camera sensor driver that's able to handle the data bandwidth and line rate of the sensor with full processor offload. The MT9M114 like the OV5640 has a databus that runs at 80 MHz which is the maximum limit of the STM32H7's DCMI hardware and stresses the STM32H7's memory architecture.
Anyway, production is unblocked for the OpenMV Cam H7. We will be building3240 units. However, about 2176 have already sold. We will only have about 1K units left in general inventory for folks to buy.
However our manufacture managed to secure parts to produce another 2160 OpenMV Cam H7 units last year in anticipation of the chip shortage.
So:
If you are interested in buying OpenMV Cam H7 units please send us an email now to pre-order stock if you need to buy 100+ units. For the remaining 2176 units we need to produce we will not be able to ship them to customers except in bulk of 100+ units.
We do not have access to anymore STM32H743VIT6 chips and have no idea on when we can produce anymore OpenMV Cam H7 units after the above stock runs out. If you want the OpenMV Cam H7 you should pre-order now. Once the above sellout we will not likely re-stock until the chip shortage eases.
The new system will be called the OpenMV Cam H7 R2. We will have the product updated on the website shortly. Right now the OpenMV Cam H7 product itself can be pre-ordered which will be switched to the R2. To avoid any functional surprises only the camera module was changed. The base board remains the same.
OpenMV Cam H7 Plus Update
For the H7 Plus we were promised 6K STM32H743II chips in June. These orders have fallen through. Given this, we hope to receive 2K more chips from another distributor in October.
So... the H7 Plus is going to remain out of stock. Note that 600 units of the above 2K have already sold. If you are interested in pre-ordering the H7 plus you should do so now to lock yourself in-line for the 2K supply of chips we hope to receive.
OpenMV Cam H7 Plus Alt
We tried to purchase different packages of the STM32H7 chip to keep producing the OpenMV Cam H7 Plus. However, while we placed a complete down payment on 1K chips with a different package for delivery in June... our order was cancelled and moved to a delivery date next year in 2022. So, I repeat that the above 2K we hope to receive in October is all that we will receive. If you go onto FindChips and search for the STM32H743 everything is out of stock of all packages.
Firmware Update
Firmware v4.0.2 has now been pushed to the IDE for download! Full MDMA offload support with 0% processor overhead is now working on all H7 based OpenMV Cams. With firmware 4.0.2 you get the benefits of triple buffering in the camera driver along with MDMA doing all the work receiving the frame.
Additionally, we finally added frame rate control via set_framerate(). Now if you want to set the camera FPS to exactly 30 Hz you can. The feature works by selectively dropping frames in the camera driver. And if possible, it will also adjust the camera sensor FPS to save power and improve image quality by increasing the exposure.
IDE Update
We've been trying to release a new version of OpenMV IDE with support for non-stm32 based microcontrollers. Our focus will be on this now. Also! Tabs are coming to OpenMV IDE! Along with a lot of other new features. We're going to focus on trying to get an IDE release out in the next couple of weeks followed by a second release with a lot of new editing features like split panel text editors and code minimap support.
Anyway, that's all folks! And... please pre-order the OpenMV Cam H7 or send us your bulk purchase order requests via email. We do not have a timeline for more stock once the above units run out - which can happen quickly. Our store was mobbed back in March with customers buying up everything.
]]>
https://openmv.io/blogs/news/the-path-to-performance-part-32021-06-06T22:10:11-07:002023-12-11T15:41:30-08:00The Path to Performance - Part 3Kwabena Agyeman
Hi Folks,
All right! Three blog posts in three weeks! Who knew I had the time.
Part 3 - The Master DMA Controller
Last week I talked about the importance of DMA memory buffer locality and putting the DMA memory buffers in SRAM in the same AHB matrix region as the DMA controller. However, SRAMs are limited in size. How can you move chunks of data in the SRAM buffer into a larger buffer in SDRAM? Certainty you can use the processor, but, with the STM32H7 you have access to the Master DMA controller to do this for you without loading the CPU.
The Master DMA (MDMA) controller is a high performance DMA controller on the STM32H7 with A LOT more functionality for data movement than the standard DMA controllers on STM32 Microcontrollers. In particular, it can trigger off of other DMA controllers when they finish moving data allowing it to act like a mini-processor that's interrupted to memcpy() data from one buffer to another.
How we use it on the STM32H7
Like many pieces of hardware on the STM32H7, explaining what modules can do doesn't really give any insight on how to use them. So, instead, I'll explain how our camera driver achieves 100% image capture offload for the CPU using MDMA. Buckle up!
Line Capture using DMA
There's quite a bit of complexity in our new camera image capture driver. We've really pushed it to the max this last year. But, it's pretty straight forward to explain how we used MDMA here. First, we use a DMA controller to receive lines of pixels coming from the camera. Lines are loaded into the same memory buffer at the same starting address over-and-over again.
As mentioned in previous blog posts, we have to follow all the memory alignment and data size rules for the DMA controllers here. So, the line buffer is 16-byte aligned and we are moving the image in 16-byte chunks to keep the DMA controller happy (however, per-line we only have to be 4-byte aligned but the total image must be 16-byte aligned).
That said, to enable architecturally efficient cropping when you want to crop more than 4-bytes worth of pixels per line, we tell the DCMI hardware to drop the first 1-3 bytes of each line to ensure that the first pixel of the cropped image is on a 32-bit boundary. Once this is done we can then just change the starting address of where we want to grab pixels from to crop the image with MDMA while being able to maintain 4-byte alignment which is critical for keeping performance up on the 32-bit AHB bus.
DCMI hardware also takes care of vertically cropping the image too by dropping lines before a starting line and after an ending line. So, along with the above trick image cropping is fully offloaded to the hardware.
MDMA to Frame Buffer
Next, MDMA moves each line of the image to the frame buffer. As mentioned above, to handle cropping we simply program MDMA with the number of lines it needs to move, the size of each line, and a starting address offset into the line buffer. It then takes care of the rest by triggering off each time DMA2 completes a line transfer of the image. Once the MDMA Controller is done it generates a transfer complete interrupt to let us know it's finished writing the image!
Now, the real magic with MDMA is in its memcpy() features. Image data isn't directly usable all the time. In particular, some cameras send us byte reversed RGB565 pixels that the processor would normally have to byte-un-reverse. But, the STM32H7 designers foresaw this issue and gave the MDMA controller the ability to byte-reverse, half-word reverse, and word reverse the data it's moving!
Next, sometimes we have to extract the Y channel from YUV422 images to get a grayscale image out of the camera. This takes quite a bit of processor bandwidth as it can't be done very efficiently. But, MDMA can do this too! It supports flexible source and data size increments allowing us to program it to grab one byte every two bytes to extract the Y channel from YUV422 images (YUV422 images are organized in a repeating YUYV byte pattern).
After the image has been fully transferred we enqueue it into our flexible frame buffer architecture (using pointers). The processor has to do this part. Then when a new image is received by the DCMI hardware we start the process all over again to receive the next frame. All this happens in the background while we're running your code. In triple buffer mode (which is the default on the OpenMV Cam H7 Plus, the OpenMV PureThermal, and the Arduino Portenta H7) we're able to constantly receive images in the background and store images to SDRAM with effectively ZERO processor overhead. Then when you call snapshot() you're just setting the frame buffer to point to the latest frame that was captured making sure that you have the most recent image (along with having to invalidate the cache where the image was placed in a 32-byte aligned and 32-byte multiple image buffer).
]]>
https://openmv.io/blogs/news/the-path-to-performance-part-22021-05-30T22:10:44-07:002023-12-11T16:29:46-08:00The Path to Performance - Part 2Kwabena Agyeman
Hi everyone,
Time for the next blog post. Going to try to keep doing an update for this series every week. But first:
The PureThermal OpenMV is now$259.99! We managed to shave $30 off the BOM looking for cost savings (we wanted to get it to $249.99 but couldn't get it that low thanks to the current chip market).
Yes, these blog posts are a vehicle for me to keep blasting the email list about the PureThermal OpenMV. But, I'm also writing genuinely useful content below. Maybe I'll have a demo video next week showing something cool onboard off.
Part 2 - DMA Buffer Locality
Where you put DMA buffers in RAM matters. It determines how data flows around in system buses on chip and determines what resources are under load. For example, with the PureThermal OpenMV we're able to do:
Constant Image Capture with the OV5640 at 80 MB/s
Constant Display Buffer Update (50 MB/s)
Constant Display Update at 1280x720 @ 60 Hz (111 MB/s)
Constant SPI Bus Input of the FLIR Lepton 3.5 (2.5 MB/s)
Constant SPI Bus Output for a TV Shield (10 MB/s)
Constant WiFi Output (1.25 MB/s)
Constant USB Output (1.25 MB/s)
Constant SDIO Output (12.5 MB/s)
At the same time! When we first tried to do all this at once our code fell over. DMA FIFOs overflowed, things locked up, nothing worked. But, we found the answer when looking at the system bus architecture.
The STM32F4/STM32F7 System Bus
If you dig into the STM32F427 reference manual you'll find the below system bus architecture.
When we first started developing our firmware on the STM32F427 we didn't have to worry too much about the location of the DMA buffers in SRAM. The camera was slower, we weren't using SDRAM, and the processor was simpler. So, we made no effort to locate DMA buffers optimally.
Now, here's how to look at the picture above. You'll notice there are three SRAM banks. The reason for this is that it allows three masters to read/write to all SRAM banks at the same time. The bus masters are the devices at the top of the matrix while the bus targets are the devices on the right. The bus matrix on the STM32F427 allows all masters tosimultaneously read/write to all targets at the same time as long as multiple masters are not trying to share a target. Finally, the dots above show what targets masters can access. For example, if you look carefully above you'll notice that most bus masters can't access AHB1/2 peripherals - just RAM.
Moving on, even on the STM32F765 ST kept the same type of architecture:
Like the STM32F427 System Bus there's one main matrix with three SRAMs available for use. There are two SRAMs on the main system bus matrix along with the DTCM SRAM which all bus masters can access via the AHB slave port on the ARM-Cortex-M7 Processor. Our firmware originally roughly stayed the same between the STM32F4/F7 because of this.
Enter the STM32H7 - A System-on-a-Chip
Now, the STM32H7 is quite a different chip than the STM32F4/F7. While theSTM32F4/F7 chips look like very high performance Microcontrollers the STM32H7 is clearly a System-on-a-Chip:
It's gotthree system bus matrices, with a64-bit AXI bus domain(there are three domains because each can be shutdown to save power). What's AXI? Well, it's a split transaction bus architecture that lets masters issue read/write requests in such a way that resource locking of the bus is minimized. On the AHB Bus a master locks the bus exclusively for the time it takes to complete the read/write. If one master is doing a read which may take a long time to complete another master cannot execute a write while the bus is idle waiting for the read response. With AXI you actually have five transaction channels between each master and target for write requests, write data, write responses, read requests, and read responses. This allows a target to receive multiple read/write requests at the same time, choose how to handle them for the best performance, and respond to the transactions without blocking.
Clearly, with AXI you're not going to have a bandwidth problem on the STM32H7. It's running at 240 MHz with a 64-bit databus for 1.92 GB/s of memory bandwidth. But, you'd be wrong, because, not all bus masters are the AXI domain - some are still the in AHB domain.
The Choke Point
To link the AXI Bus domain to the AHB Bus domain ST choose to use AHB buses. There's the D1-to-D2 AHB Bus and the D2-to-D1 AHB Bus which allow bus masters to communicate across domains. These 32-bit buses run at 240 MHz for 960 MB/s of bandwidth. But, unlike AXI, AHB buses are locked when a master performs a read/write. For example, if DMA2 wants to read from SDRAM it must:
Win arbitration access to the D2-to-D1 AHB Bus.
Use the D2-to-D1 AHB Bus to send a transaction to the SDRAM.
Wait for the SDRAM to respond (might be a while - 100s of clocks)
Return the result over the D2-to-D1 AHB Bus
And... during the time above no other bus master may use the D2-to-D1 AHB Bus. If you recall from the previous blog post, DMA engines on the STM32 line of microcontrollers only have 16-bytes of onboard FIFO space. These FIFOs cannot handle reads/writes taking a very long-time to complete and not overflow if they are constantly receiving data from a peripheral. So, if you were trying to write image data from a camera to SDRAM while pulling another frame from SDRAM to send to SPI using DMA things will crash.
The Solution - Use the Architecture Features!
Back to my original observation, the chip designers at ST put SRAM blocks in different domains. This is on-purpose to solve this exact problem. DMA1/2 are designed to target peripherals and SRAM1/2/3 while BDMA is designed to target SRAM4. By locating DMA buffers in their local SRAM banks you can significantly reduce system bus congestion ensuring that the bandwidth you need is available.
So, the rule is simple. If you've got a real-time DMA transaction that you cannot back-pressure locate it's DMA buffer in the local SRAM near that DMA controller. Do this and things will just work.
Next Week - MDMA
There's another DMA controller on the STM32H7. The Master DMA controller. In the next blog post I'll explain how to use it.
Thanks for reading, that's all folks!
]]>
https://openmv.io/blogs/news/the-path-to-performance-part-12021-05-23T22:23:50-07:002023-12-11T16:32:37-08:00The Path to Performance - Part 1Kwabena Agyeman
Hi folks,
Normally I'm more focused on adding new features than blogging. But, we made a lot of changes under to hood to enable triple buffering for image capture and I'd like to share! But, first...
GroupGets updated the PureThermal OpenMV Cam campaign! There's a lot more information on the product available now. The complete feature list, schematic, board outline, and more are posted! We put a lot of love and work into the product and would love if you could back it! It's the most feature packed OpenMV Cam to date. Please watch the video of me explaining it below:
Right now the price is a little high, but, once the chip shortage eases (no joke parts are more than 2x more expensive right now) and production ramps up we hope to drive the price of this feature packed system down. Please back the PureThermal OpenMV today!
Now, time for a deep dive on the technical topic for today.
Part 1 - Memory Alignment
When we first started developing the OpenMV Cam we were working on the STM32F4 architecture. Like other microcontrollers the architecture features the Cortex-M4 at the heart of the system. The Cortex-M4 is a straight forward processor which can read/write 8/16/32-bits at a time without side affects making coding with it easy. What you program is what you get. So much so that we developed most of our original code with with the assumption that we just needed to maintain 4-byte alignment when allocating memory - or maybe 8 to support 64-bit values.
Enter DMA (Direct Memory Access)
DMA Controllers are a tricky beasts. Our original firmware until recently avoided using them. If you've been programming microcontroller firmware lately you've probably avoided using them too. They are overkill for most applications - the processor can generally do all that you need to do. But, if you've been avoiding them too like we were then you would have been leaving a massive amount of performance on the table. Using a DMA controller in your application is not straight forward. There's a big challenge you need to solve first that will trip you up indefinitely - memory alignment.
On the STM32 line of microcontrollers DMA Controllers have 16-byte deep FIFOs that can hold four 32-bit values, eight 16-bit values, or 16 bytes. The DMA controllers work by filling their FIFOs with data coming from a peripheral like the camera interface 32-bits at a time before flushing their internal FIFO to memory. Now, the DMA Controllers are not sophisticated. They work on the system bus level of the hardware. Meaning, they will not automagically abstract away complexity like the Cortex-M4 processor does to make your life easier. In particular, there are two rules you must follow when using the STM32 DMA Controllers:
The AHB bus allows burst transactions of 4, 8, or 16 beats (these are the most efficient types of transactions as an address arbitration per element can cut a bus bandwidth in half or more). This matches directly to the four 32-bit values, eight 16-bit values, or 16 bytes that the DMA Controller's FIFO can hold. So, to get the best performance you're going to want to make your data buffer a multiple of the above values... which is 16-bytes.
The AHB bus wraps all burst transactions at 1KB boundaries. To avoid this from happening we must ensure that we never allow a burst transaction to cross the 1KB boundary. Luckily this is pretty simple since we are always transferring 16-bytes... so we just need to ensure that our memory buffer is 16-byte address aligned and this will ensure we never cross a 1KB boundary.
If you follow the two rules above, then DMA is easy-to-use on the STM32. It will work as expected without much fuss. But... this is easier said than done though as if you've been developing lots of code without respect for these two rules then you're going to be in for a lot of work like we were when trying to turn DMA on.
Enter the Cortex-M7 and the Cache
But, the OpenMV Cam M7/H7 are powered by the Cortex-M7 which features a cache! The cache automagically makes your code run a lot faster - but, using it with DMA is challenging. Because, while it hides a lot of system complexity from you it does not play nicely with DMA hardware.
The cache on the Cortex-M7 works by reading/writing cache lines which are 32-bytes in size. Note that it can only read/write cache lines. So, anytime it reads/writes it will always be a 32-byte chunk address aligned to a 32-bytes.
Additionally, as a cache, by definition it only reads main memory when something is not already in the cache and it only writes to main memory when it has to flush a line (or lines) from the cache. So, DMA updates to main memory are invisible unless you invalidate the cache covering the memory buffer DMA is writing to forcing the cache to read the updated memory. Similarly, processor writes will be invisible to DMA unless you flush the cache to the memory buffer DMA is to read. While more complex microprocessors have cache coherency built into the hardware to handle this for you the Cortex-M7 does not so you must deal with it yourself.
Anyway, given the cache line rule, we must again extend our memory allocation requirements. Which is, memory buffers must be multiplies of 32-bytes in size and 32-byte address aligned. If you follow this rule then working with the Cortex-M7 and DMA is a breeze. Things will just work!
And... if you don't you will experience some of the most challenging bugs created by race conditions between the cache and DMA Controllers in your code.
Next Week - DMA Buffer Locality
Did you know the STM32H7 is a SoC (system-on-a-chip)? Next week we'll cover DMA buffer locality and it's affect on performance.
Thanks for reading, that's all folks!
]]>
https://openmv.io/blogs/news/introducing-the-openmv-cam-pure-thermal2021-05-16T19:53:46-07:002023-12-11T16:36:20-08:00Introducing the OpenMV Cam Pure ThermalKwabena Agyeman
Hi everybody,
You can now pre-order the OpenMV Cam Pure Thermal. It's out latest OpenMV Cam which pushes the STM32H7 architecture to the max! It's so good Hackster even did a Spotlight video about it!
The OpenMV Cam Pure Thermal allows you to create mixed color and thermal camera applications for hobbyist or professional uses. It's a great product which we've spent a lot of time developing.
If you've like what we've done with the OpenMV Cam and are a supporter of the project please pre-order the OpenMV Cam Pure Thermal. Your support will enable the creation of future products like support for the FLIR Boson, Stereo Thermal Vision, and FPV Thermal Vision.
Alright, this is a big one folks. Our latest firmware is available for download. We've brought some big features folks have been waiting for years out now:
Double/Triple/Video Buffering
Bayer Image Processing Support
Usable WiFi Debug Support
With Double/Triple/Video Buffering Support all OpenMV Cams (M4/M7/H7) now can process and capture images simultaneously. This feature is enabled automatically for all OpenMV Cams meaning once you install firmware 4.0.0 frame rate limited algorithms will automatically experience a massive increase in speed.
Additionally, for video recording we now support allocating an arbitrary number of frame buffers. Just do sensor.set_framebuffers(10) for example to allocate a 10 frame buffer FIFO to handle the random erase delays caused by an SD Card when recording video.
By default triple buffering is enabled which offers the best best performance. In this mode the interrupt driven frame grabber always has a buffer to store data to while your code is processing one of the frame buffers. However, if you don't have enough RAM for this you can downgrade to double buffering which captures an image in the background while processing the current image. Double buffering only provides increased performance though as long as your algorithm can process images faster than new frames from the camera are generated. Finally, single buffer mode still works which your OpenMV Cam will default to if it can't fit multiple buffers without using up more than half of the RAM onboard.
Last, we finally got the Master DMA hardware onboard the STM32H7 working which 100% offloads the processor from copying image data from camera line buffers to the finally image. This further improves the frame rate on the STM32H7 as the processor no longer has to copy the image data. And... we have further speed performance improvements coming soon. Right now the processor has to handle an interrupt per line from the camera in-order to setup the MDMA transfer. But, we should be able to get MDMA working to completely offload the CPU so that we only get an interrupt per image.
And... we also have non-blocking snapshot support finally. You can register an interrupt handler to be called when an image is ready or poll a flag to let you know when there's a frame available.
Bayer Image Processing Support
Now you can do more things than just look at Bayer images in the IDE. We're going to be slowly integrating Bayer Image support to all functions which don't modify the image in our API. We'll also be introducing JPEG image processing soon too - with hardware decompression acceleration on the STM32H7.
WiFi Debug Support
Finally, we've got usable WiFi Debug support. This means you can FINALLY CONTROL YOUR OPENMV CAM WIRELESSLY FROM YOUR PC USING OPENMV IDE WITH A WIFI SHIELD!!! Please watch the how-to video below:
This feature will be coming soon to the Arduino Portenta H7 WiFi/Ethernet once Arduino asks for it.
Manufacturing Update
So, we've run out of OpenMV Cams in stock to sell on our store. Unfortunately, the chip shortage has made it impossible to buy the STM32H743VIT6. However, we managed to get 3K for building more OpenMV Cam H7 units and we've ordered 8K STM32H743II chips which we expect 2K to be delivered in a few months and the rest to arrive in October.
In the mean-time, we are going to be building OpenMV Cam H7 Plus units using the STM32H743XI package to get something in stock to sell. So, you may see a different hardware variant of the OpenMV Cam H7 Plus sold. Similarly, we are also making a design for the OpenMV Cam H7 with the STM32H743VIH6 (BGA versus LQFP) to make it easier to keep the OpenMV Cam H7 in stock too.
However, while we should be able to get and build OpenMV Cams using different STM32H743 chip variants the OV7725 was EoLed by OmniVision and is no-longer going to be produced. Given this we will be switching the main camera to the MT9M114. New OpenMV Cam H7 units will be called the OpenMV Cam H7 R2. Similarly, the OV5640 is nearing end-of-life and we will be working on finding a replacement for it. There are a lot of FPC modules on the market however for this chip so it's less of a problem sourcing it than the OV7725.
IDE and Docs
We're working on updating the docs for firmware 4.0.0 and we'll be releasing an IDE update soon with new editing features allowing you to finally have multiple python scripts open at the same time. We hope to have a new IDE release out in a few weeks.
]]>
https://openmv.io/blogs/news/openmv-ide-2-6-9-released2021-02-02T20:40:17-08:002023-12-11T16:41:28-08:00OpenMV IDE 2.6.9 Released!Kwabena Agyeman
Hi everybody,
OpenMV IDE 2.6.9 is out! It includes several bug fixes to the usability of the IDE and the latest firmware, 3.9.2!
We completely overhauled our thermal sensor support in the FIR module.
Bilinear/Bicubic scaling is now supported for upscaling all low-resolution sensors (along with color table support, better alpha blending control, and etc. - all thanks to our new scaling pipeline).
Support for the MLX90641 was added. The OpenMV Cam's firmware now supports the MLX90621, MLX90640, MLX90641, and AMG8833.
And... support for the FLIR Lepton 1, 2, 2.5, 3, 3.5 has been added to the FIR module allowing you connect an external FLIR Lepton sensor to your OpenMV Cam using a Lepton breakout board.
This allows you to do dual thermal and normal vision on any OpenMV Cam (even the old M4!).
We also completely overhauled the TV driver. It now supports the 352x240 SIF NSTC resolution at a 60 Hz update rate. Additionally, it now has all the same scaling features as the updated LCD code - like triple buffering and bicubic/bilinear scaling. This makes the TV driver significantly more useful for wireless display output.
We are also continuing to integrate the new scaling pipeline into more and more functions in the firmware. to_bitmap(), to_grayscale(), to_rgb565(), to_rainbow(), copy(), crop(), scale() were all updated with the new pipeline bringing bicubic/bilinear scaling to these features along with rgb565 channel extraction and color table support.
What's next?
The LCD, FIR, and TV module were all redone to support the launch of the OpenMV Pure Thermal coming later this year. We are just waiting on the second revision of the board to come back for testing before launching the funding campaign for it. A teaser is below:
In the mean-time, we will be adding support for Embedded Display Port out over the Arduino Portenta's USB connector using the STM32H7's MIPI DSI controller next and then finally adding support for triple buffering in the camera sensor driver. Once triple buffering is integrated you will instantly see a massive boot in your algorithm FPS as the processor will no longer ever have to wait for a frame to be received. On the STM32F4 and STM32F7 based OpenMV Cams this will result in a rather high number of interrupts per second in the 50K+ range to handle data... so, it's not going to be advised on older models. However, on the STM32H7, thanks to the MDMA hardware, we will be able to enable triple buffering of the camera data stream with nearly zero CPU load.
Anyway, that's all folks!
]]>
https://openmv.io/blogs/news/arduino-partnership2020-11-16T22:04:05-08:002023-12-12T16:51:54-08:00Arduino PartnershipKwabena Agyeman
Hi folks,
We have a big update today. We've been doing a lot of work over the last few months and we have some major announcements. First...
This was actually announced at the beginning of last month, but, we've been way to busy to write an update email. Given that, if you want to stay up to date on any announcements we encourage you to follow us on Twitter where we post anything we're thinking about much more quickly.
Anyway, with this Partnership we'll be working closely with Arduino to improve the performance of the OpenMV library, including support in our firmware for things like Ethernet, SDIO WiFi, DisplayPort, and more!
In particular, with the Arduino Portenta H7 we are enabling audio support for using TensorFlow in MicroPython to classify sounds.
The OpenMV PureThermal
Next, besides for working with Arduino we're also Partnering with GroupGets to develop the OpenMV PureThermal board. This is the most advanced OpenMV Cam to date. It features:
The STM32H743XI chip with 168 I/Os where we used every single one!
An OV5640 5MP module with AutoFocus
A FLIR Lepton 3.5 (runs in parallel with the OV5640)
A uSD Card Slot (25 MB/s)
64 MB of 32-bit SDRAM at 100 MHz (400 MB/s)
32 MB of Quad SPI Flash (50 MB/s)
32 KHz Crystal for RTC operation while in deep sleep
DVI Support over an HDMI connector (up to 1080p at 30 Hz)
SparkFun QWIIC (SEEED Grove Compatible)
RGB LED + Flash LED Support
Buzzer Support (not shown in the picture above)
And... the same OpenMV pin headers for expansion support
Special care was put into designing the OpenMV Pure Thermal. All external connectors on the board have TVS Diodes and we use RF chokes on high speed interfaces like the DVIoutput. Additionally, we made sure to tie all I/O pins on the board to the correct state when the main processor shutsdown so you can actually get the power consumption in battery mode to the sub 1mA range.
Here's a demo of the LCD working while we're doing board bringup.
Moving on, we plan to launch the OpenMV PureThermal at the beginning of next year. Stay tuned for more updates about the product. Please note that we've designed the OpenMV PureThermal for the needs of businesses, so, we focused on packing it with features versus trying to keep the price low. But, it should have everything you need to build your own professional Thermal Vision camera with great features.
Good Scaling Support is finally here!
For the longest we haven't had decent scaling support. However, we just integrated a new bilinear/bicubic scaling pipeline. This is actually a huge piece of code which features optimized loops for nearest neighbor, bilinear, bicubic, and area scaling for binary, grayscale, and RGB565 images. Additionally, after scaling is complete we have a tight optimized loop for drawing that scaled image using alpha, and/or an alpha lookup table, and/or a color look table, and/or rgb channel extraction, on binary, grayscale, or RGB565 images. Finally, we leverage DMA2D support where we can to handle blending in the background while the processor is scaling an image.
All of this code leads to the following performance numbers (without DMA2D enabled):
To get this level of performance we really dug deep into code optimization with the help of Larry Bank. Liberal use of the SIMD instructions on the Cortex-M7 made this type of performance possible. Moving forwards, we're not going to be leaving any performance on the table anymore. We're going to start leveraging as much of the STM32 hardware as we can now and write more SIMD double pumped code.
Once we have time we will be updating lens_corr() and rotation_corr() using SIMD tricks.
Best of all, note that this code works and speeds up all OpenMV Cams. Not just the H7 but also the M4 and M7.
Better LCD Support
Finally, thanks to the support of Arduino and GroupGets we're going back through our old code and massively updating the performance.
With the latest updates the LCD module now supports any resolution of SPI LCD screens with triple buffering support (if you enable this and spend the RAM) which completely decouples the process of updating the LCD screen from drawing on it. We developed triple buffering code for the 800x480 24-bit parallel LCD for the OpenMV PureThermal. But, we decided to improve our old SPI LCD support too. Additionally, since we have scaling support now we decided to integrate the new scaling pipeline into the lcd code so that you can now seamlessly scale up and down the image you're drawing on the LCD screen too.
These same improvements will also be coming to the TV module soon.
Anyway, that's all folks! Please follow us on Twitter and sponsor us on GitHub.
]]>
https://openmv.io/blogs/news/arduino-interface-library2020-08-31T13:32:00-07:002023-12-11T16:54:44-08:00Arduino Interface LibraryKwabena Agyeman
Hi everybody,
Just a short update, our Arduino Interface Library is finally here! You can use it to connect an OpenMV Cam to an Arduino over SoftwareSerial, HardwareSerial, SPI, I2C, and even CAN! The library includes supports for connecting your Arduino to your OpenMV Cam (or many via SPI/I2C/CAN) and also support for connecting to another Arduino (or many via SPI/I2C/CAN).
The interface library is available for download from the Arduino IDE Library Manager. You can install and play with it now.
That's all folks!
]]>
https://openmv.io/blogs/news/edge-impulse-is-here2020-07-18T15:12:00-07:002023-12-11T16:58:58-08:00Edge Impulse is here!Kwabena Agyeman
Hi everybody,
With Edge Impulse you can FINALLY easily train convolutional neural networks for your OpenMV Cam! To demonstrate this, watch me train a smile/frown detector in 15 minutes using an OpenMV Cam H7 Plus below:
This is power folks, use it wisely.
We encourage everyone to signup for an account on Edge Impulse and start training CNNs using your OpenMV Cams. Right now, CNNs only run on the OpenMV Cam H7 Plus, but, Edge Impulse is working on training smaller CNNs for transfer learning that will fit on the OpenMV Cam M7/H7. In the mean-time you can get started with building a data-set and improving your CNNs accuracy now.
For a longer discussion about all of this please watch my Innovator Coffee Interview Below:
This is just the start of a new era with your OpenMV Cam. Things are only going to get better and better.
Other News
Firmware v3.6.6 has been released to OpenMV IDE. Mainly, this fixes the vision quality on the OpenMV Cam H7 Plus and updates ulab (an NumPy module for MicroPython).